Vegan Sushi
We love vegan sushi, but it can be so expensive. The good news is that it's easy to make at home, and you can even customize it to include all the stuffings you like best!
Servings: 8 rolls
Calories: 101kcal
Ingredients
- 2.5 cups uncooked short grain rice medium grain will work too
- 2.25 cups water
- 1/4 cup rice vinegar
- 1/2 cup pure cane sugar or maple syrup
- 1.5 teaspoons salt
- 8 nori seaweed sheets
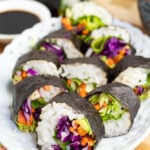
- 2 cups sliced raw cabbage purple or green or both
- 1 cup julienne carrots
- 5 romaine lettuce leaves
- 1 medium cucumber
Instructions
Making the Rice:
- Begin by rinsing the rice under cold water. The best way to do this is by using a rice washing bowl or a colander that is made for small grains.
- My sister, the recipe creator, uses a rice steamer to cook her sushi rice, and she suggests using short or medium-grain rice. Add 2.5 cups rice and 2.25 cups water to your rice steamer and press the ‘cook’ button or the applicable button for your model. Below, in the NOTES section, are the cooking methods using a rice steamer, Instant Pot, and stovetop.
- Whichever cooking method you use, be ready to transfer the cooked rice to a cooling pan as soon as it is done. If you are using a rice steamer, as soon as the cooker beeps, immediately transfer the rice to a cooling pan which can be as simple as a baking sheet. Be sure to have hot pads ready and be mindful of the steam.
- While the rice cooks, go ahead and make the rice seasoning with rice vinegar, sweetener, and salt. Mix the ingredients together in a saucepan and heat on medium-high. Watch carefully, and turn the heat off when it begins to simmer. You don’t want this mixture to come to a boil.
- When the rice has finished cooking, immediately dump it onto a baking sheet and pour the vinegar mixture over the top. Mix gently and begin spreading the rice out evenly.
- Spreading it thinly will aid in cooling it more quickly. When you stir and spread the rice, do it gently so that the rice does not become mushy. I like to draw thin lines, with my rice paddle flipped on its side, down the length of the pan using a dragging motion to accomplish this.
- Once the rice is coated with the mixture and cooling, the fun begins! In Japan, they often set the pan under a ceiling fan or make it a group event and use paper fans or a piece of cardboard to fan and aid in cooling the rice down quickly.
- Cutting the vegetables into long thick strips or Julienne style will help to spread them alongside each other to create the long, neat, horizontal rows you’re accustomed to seeing.
- These are some of the most common veggies used in sushi--Romaine lettuce, cabbages (red & green), carrots, radishes, bell pepper, avocado, cucumber, daikon, broccoli, broccoli sprouts, pineapple, and mango. The more colorful, the better!
- Begin by sliding your sushi mat into a twist-tie gallon-sized plastic bag or covering it with plastic wrap because it will greatly simplify the rolling and clean-up processes.
- There are two main types of rolls that we use when making veggie sushi at home. We are going to be doing maki rolls and using nori sheets for this recipe. In an upcoming article, we'll cover the uramaki rolling technic as well.
- On your bamboo sushi rolling mat covered in plastic, place a sheet of nori with the rough side up, and the lines running in the same direction as the bamboo mat.
- Spread the rice all the way out to the edges. You can use a rubber spatula, your rice paddle, or your damp fingertips to smooth it more evenly if you need to. For a maki roll, with the nori on the outside, go all the way out to the very edge except for the one furthest from you. Leave about a ½-inch edge of nori on the far end blank, that will help seal the roll later.
- Begin to add your ingredients. I add mine in the center. You want to lay out your fillings in a horizontal row. Try to keep them close enough to bundle together easily.
- Starting at the end closest to you, carefully lift the edge of the mat to bring it up and over the fillings. Begin rolling, using the mat to encourage the roll to take on a circular shape. As you roll, gently squeeze to tighten the roll up as it forms. This will help compress the rice enough to hold it together, which will keep the sushi from falling apart. Take care not to let the bamboo mat or the plastic wrap get caught up in the roll.
- When the roll is completely formed, use your fingers and run them along the ½-inch strip of nori that was left uncovered at the end with dampened fingers. This will help the edge to stick to the outside of the roll, creating a secure seal. If you are using hummus, homemade vegan cream cheese, or plant-based mayo in your sushi, you can also use these ingredients along the edges to seal the roll.
- Lightly wet a serrated or very sharp knife and begin slicing the sushi into even pieces. Every so often, you will probably need to clean off the knife and wet it again to keep the slices neat.
- If you are planning to pack these for lunch or eat them for a meal at home, you may want to cut them in half for easier handling or just skip the cutting process altogether.
Video
Notes
Cooking Methods:
- Rice steamer method- Place water and rice in the rice steamer and press the ‘cook’ button or the applicable button for your model.
- Instant Pot method- Cook in your Instant Pot on high for 3 minutes and allow for a 10-minute slow release.
- Stovetop method- Cook over high heat without the lid until it comes to a boil. Cover, reduce the heat to medium-low, and allow to cook for approximately 12 minutes. Remove it from the heat, leave the lid on, and let it steam for another 10 minutes.
- No mess- Sliding your mat into a gallon-sized twist-tie plastic bag or covering it with plastic wrap will greatly simplify the rolling and clean-up processes.
- Rice- Haiga Brown Rice is a good option because it is short-grain and sticky.
- Damp hands- Wetting your hands often while rolling the sushi will help with the stickiness.
- Storage- Wrap sushi rolls in plastic wrap individually to store. If you plan to slice them, wait until you’re ready to serve to slice. They can be stored in the refrigerator for up to 3 days.
- Bento box- Homemade sushi is great in bento boxes for packing lunches.
Nutrition
Serving: 1roll | Calories: 101kcal | Carbohydrates: 24g | Protein: 2g | Sodium: 419mg | Fiber: 2g | Sugar: 16g