
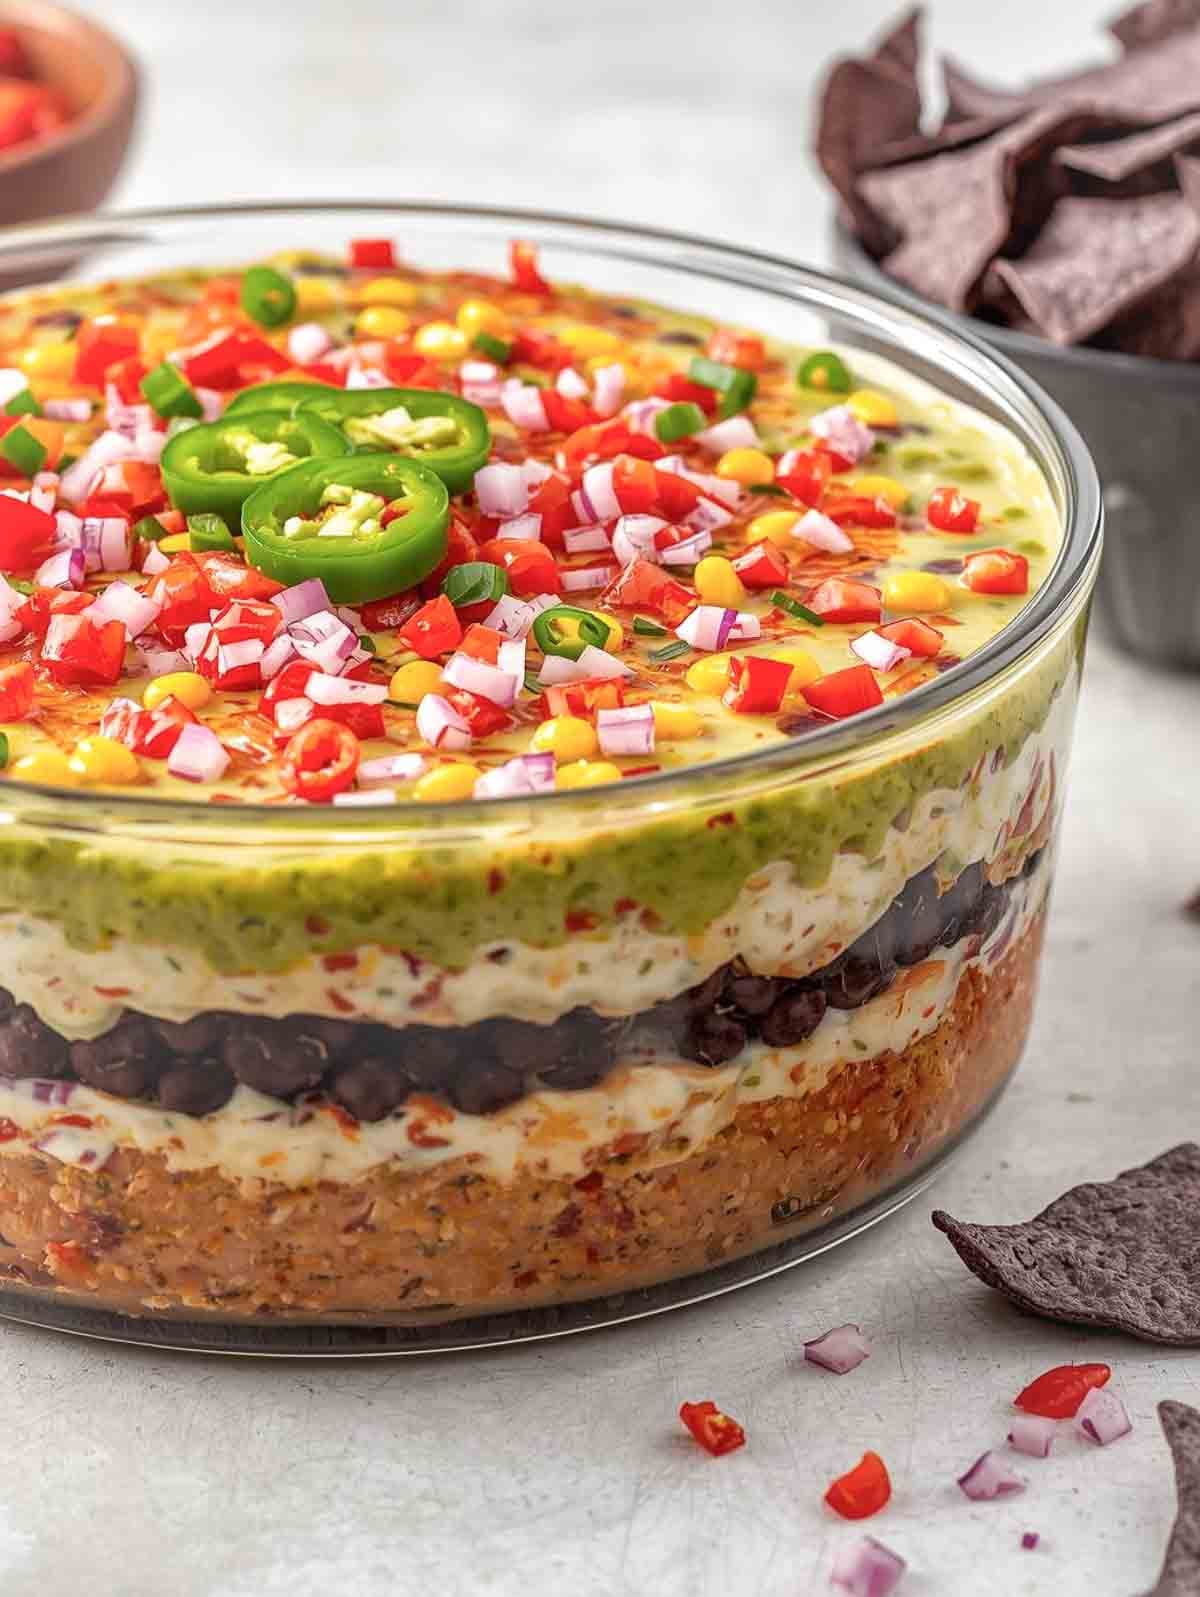
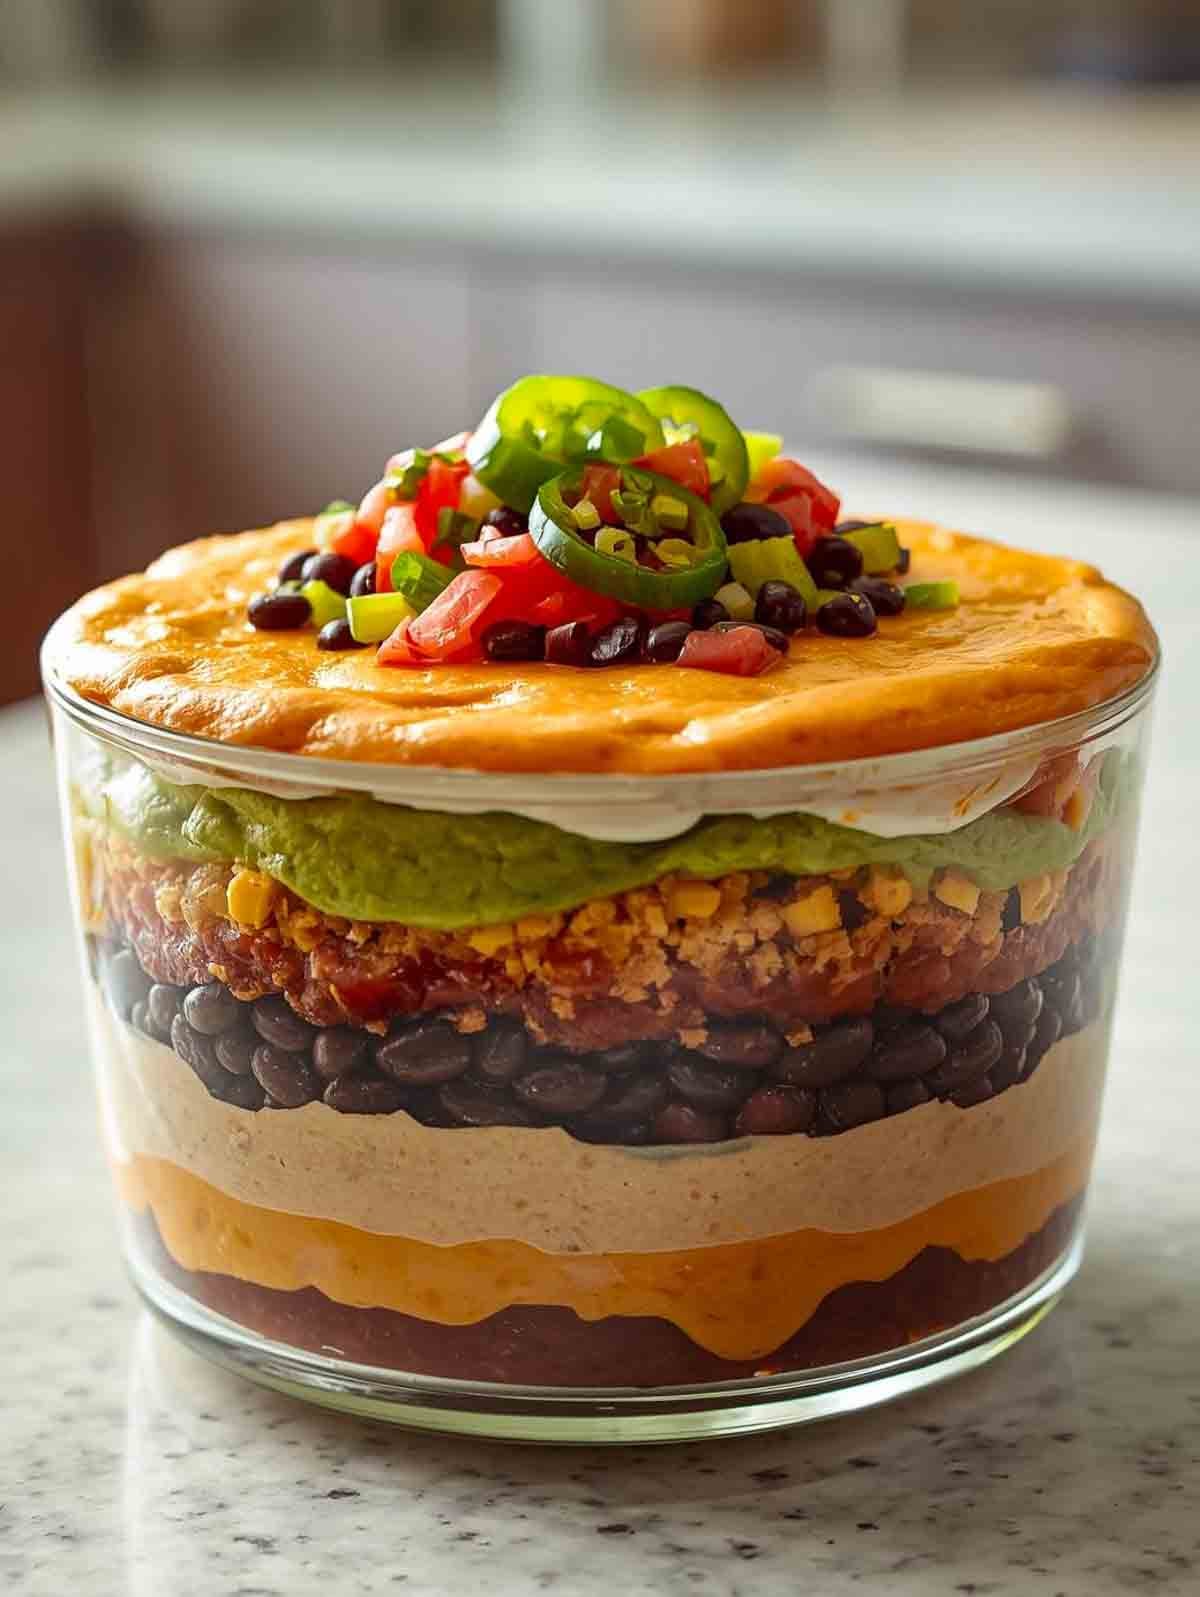
7-Layer Taco Dip
If you’re looking for a crowd-pleasing appetizer that’s as easy as it is delicious, this 7-layer taco dip is it! Packed with creamy, zesty layers like homemade cheese sauce, guacamole, and fresh toppings, this plant-based favorite is perfect for parties, game day, or anytime you need a quick and healthy snack. I love making this for gatherings because it comes together in minutes and always disappears fast—everyone keeps coming back for just one more scoop!
Want to Save This Recipe?
Enter your email & I’ll send it to your inbox. Plus, get great new recipes from me every week!
By submitting this form, you consent to receive emails from EatPlant-Based
There’s just something about a delicious and hearty seven-layer dip that brings people together. Maybe it’s the creamy layers, the bold flavors, or the way every scoop gives you a little bit of everything—but this plant-based version really takes it up a notch.
It’s loaded with homemade or canned refried beans, fresh guacamole, zesty salsa, and all your favorite toppings, making it the kind of dish that disappears quickly at any gathering. I love how simple it is to throw together, easy to customize, and always a hit—this is one you’ll find yourself coming back to again and again.
What is 7-Layer Taco Dip?
Traditionally, 7-layer taco dip is a cold, layered dish made with a delicious combination of refried beans, creamy spreads, zesty salsa, fresh veggies, and flavorful toppings. Each layer brings its own texture and taste, so every scoop is loaded with a little bit of everything.
What I love most about 7-layer taco dip is how customizable it is. You can easily keep it classic or give it a fresh twist with healthier, plant-based ingredients (which is my favorite way to make it!). Think hearty black beans, creamy guacamole, vibrant pico de gallo, crisp lettuce, and maybe even a dairy-free sour cream or homemade cheese sauce. It’s one of those recipes that looks impressive, tastes amazing, and comes together with minimal effort—basically, the kind of dish that makes you feel like a kitchen rockstar without breaking a sweat.
Reasons You’re Going to Love This Taco Dip
- Makes large portions for feeding a crowd – This recipe is perfect when you need a hearty appetizer that stretches to serve lots of hungry guests.
- Loaded with fresh, wholesome ingredients – Beans, veggies, and healthy fats make this dip both delicious and nourishing.
- High in fiber and plant-based protein – Thanks to beans and veggies, it’s a snack you can feel good about.
- Perfect party appetizer – A guaranteed crowd-pleaser for game days, potlucks, holidays, and family gatherings.
- Bold, Mexican-inspired flavors – Every bite is packed with savory, zesty, and creamy goodness.
- Easy to customize – Swap ingredients or adjust spice levels to fit your taste preferences.
Ingredients Needed for 7-Layer Dip

Each layer in this 7-layer taco dip brings something special to the table—flavor, texture, color, and that “can’t-stop-eating-it” factor. Here’s what you’ll need and why each one matters:
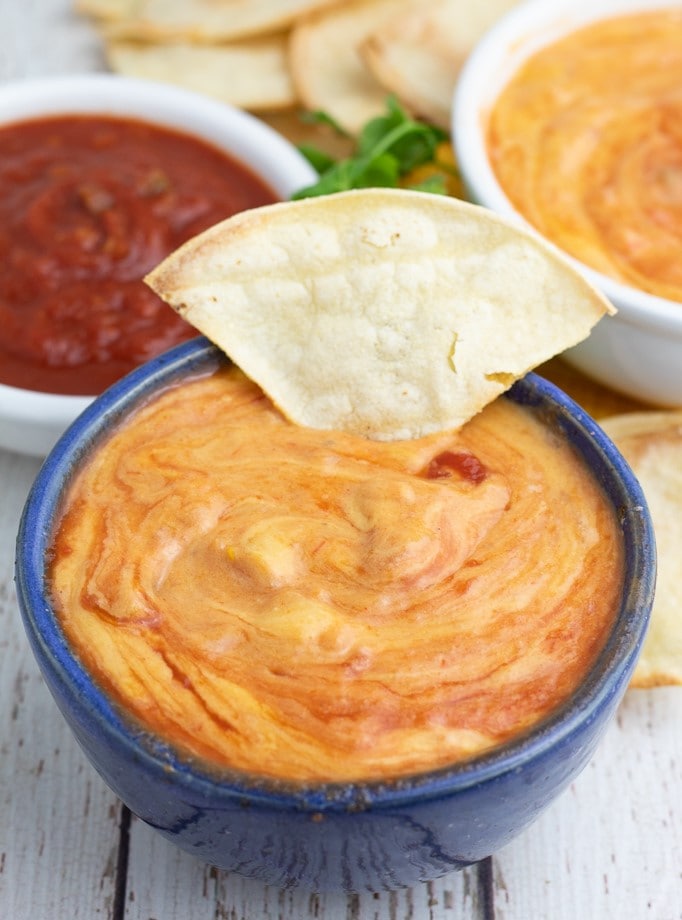
🧀 Homemade Cheese Sauce – This creamy, dairy-free cheese sauce ties everything together with rich, cheesy flavor—without any actual dairy. It adds that classic taco vibe while keeping things plant-based and wholesome.
🫘 Refried Beans – The hearty base of the dip! Refried beans create a thick, satisfying layer that holds everything in place and adds a savory, slightly smoky depth. Even start from scratch and make your own slow-cooked crock pot pinto beans.
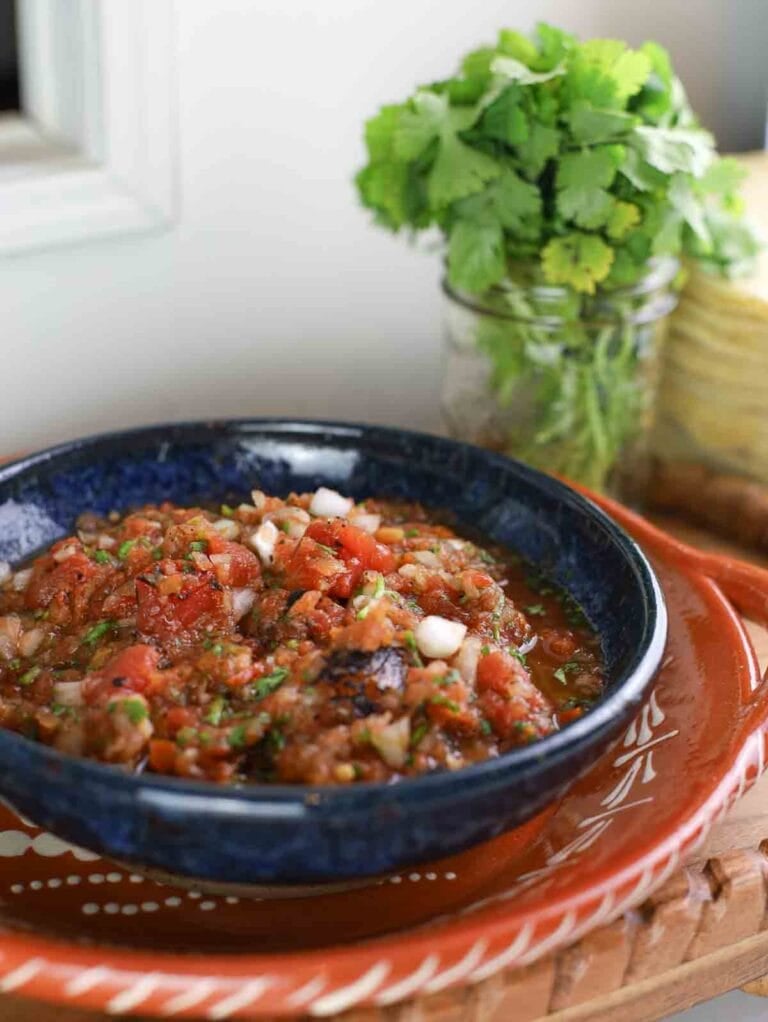
🍅 Chunky Salsa – Bright, zesty, and full of flavor, chunky salsa brings a juicy freshness that balances out the creamy layers. It also adds a little kick, depending on the heat level you choose.
🥑 Guacamole – Smooth, creamy, and absolutely irresistible, guacamole adds richness and healthy fats. It’s one of those layers that makes people go back for “just one more scoop.”
🌽 Black Beans & Corn Mix – This combo adds texture, color, and a slightly sweet contrast to the savory layers. It also boosts the protein and fiber, making the dip more satisfying.
🌿 Cilantro – A fresh finishing touch! Cilantro adds a pop of color and a burst of herby brightness that really brings the whole dish to life.
Ingredient Substitutions & Variations
🧀 Try a quicker cheese sauce option – My homemade dairy-free cheese sauce is worth it, but if you’re in a hurry, my cashew queso comes together in about 5 minutes and makes a great substitute.
🫘 Use canned refried beans for convenience – I’ve included instructions for making your own refried beans, but if you’re short on time, canned refried beans work perfectly and still taste great.
🌮 Swap in store-bought taco seasoning – While homemade taco seasoning adds amazing flavor, a good store-bought blend is a quick and easy option to keep things simple.
🥑 Use store-bought or homemade guacamole – Grab a tub from the store for convenience or make my chunky guac recipe for extra fresh flavor.
🌶️ Mix up the toppings – I love using purple onions, fire-roasted tomatoes, and jalapeños, but you can easily switch things up with red bell peppers, chopped green onions, or even crushed blue corn chips for added crunch.
🔥 Customize the spice level – Keep it mild or turn up the heat by adding extra jalapeños, spicy salsa, or a pinch of cayenne.
🥗 Make it your own with extra layers – Add shredded lettuce, dairy-free tofu sour cream, or extra beans to bulk it up and create your perfect version.
What Type of Dish Should I Use?
One of the fun parts about making 7-layer taco dip is that you can really use just about any dish you have on hand. Round, square, ceramic, glass—it all works! If you’re serving a crowd, a clear, large casserole-style dish is perfect. For smaller gatherings or even individual servings, you can use smaller bowls or containers to create mini layered dips that look just as beautiful. I have a clear 8 x 8 pan that works perfectly.
That said, if you are making it for a crowd, need a double batch, and really want to show off those gorgeous layers, a straight-sided, clear bowl is what has become my favorite. Being able to see each colorful layer—from the beans to the guacamole to the toppings—makes the whole dish even more inviting. But don’t stress if you don’t have one—no matter what dish you use, it’s what’s inside that keeps everyone coming back for more!
How to Make 7-Layer Taco Dip (Step-by-Step)
The recipe card at the bottom of the page has the full list of ingredients with measurements and instructions.
You will want to make the dairy-free cheese sauce first thing. It’s really easy to make and even freezes well. I usually already have some on hand in my freezer, which shortens the steps to making any of my recipes that require cheese, such as my hash brown casserole, dairy-free broccoli casserole, and vegan scalloped potatoes. If you’re in a hurry, my 5-minute cashew queso can be substituted.

STEP #1: Making this terrific cheese sauce is as simple as boiling a pot of potatoes, onions, and carrots. Then, drain them and add them to a blender with cashews (or white beans), spices, and blend until smooth.
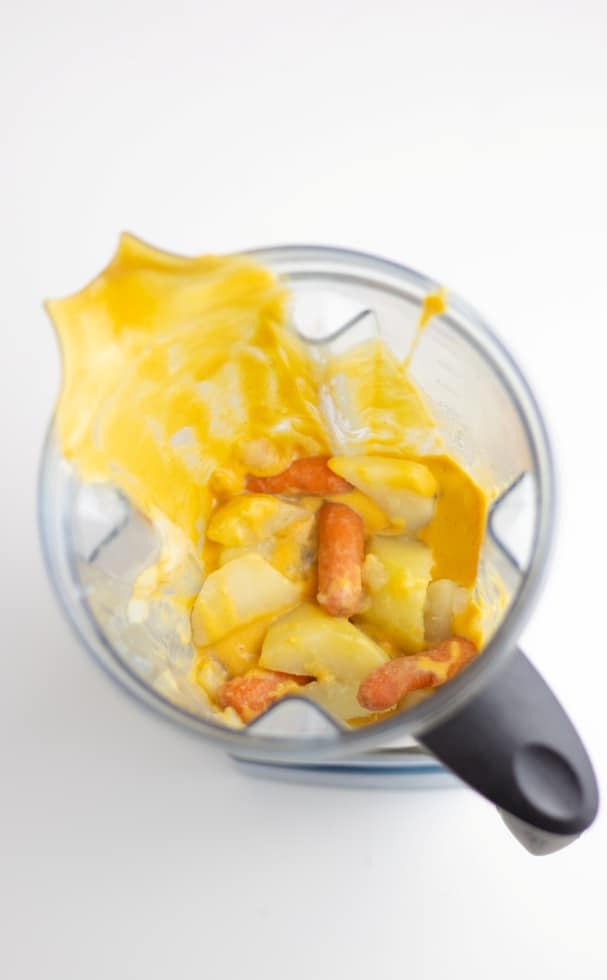
STEP #2: I have a Vitamix blender and don’t take the time to soak my cashews. It is powerful, and everything that goes into it comes out creamy. However, if your blender isn’t jet engine speed, soaking the cashews in warm water for at least 30 minutes before adding to this recipe will help this recipe come out more creamy.
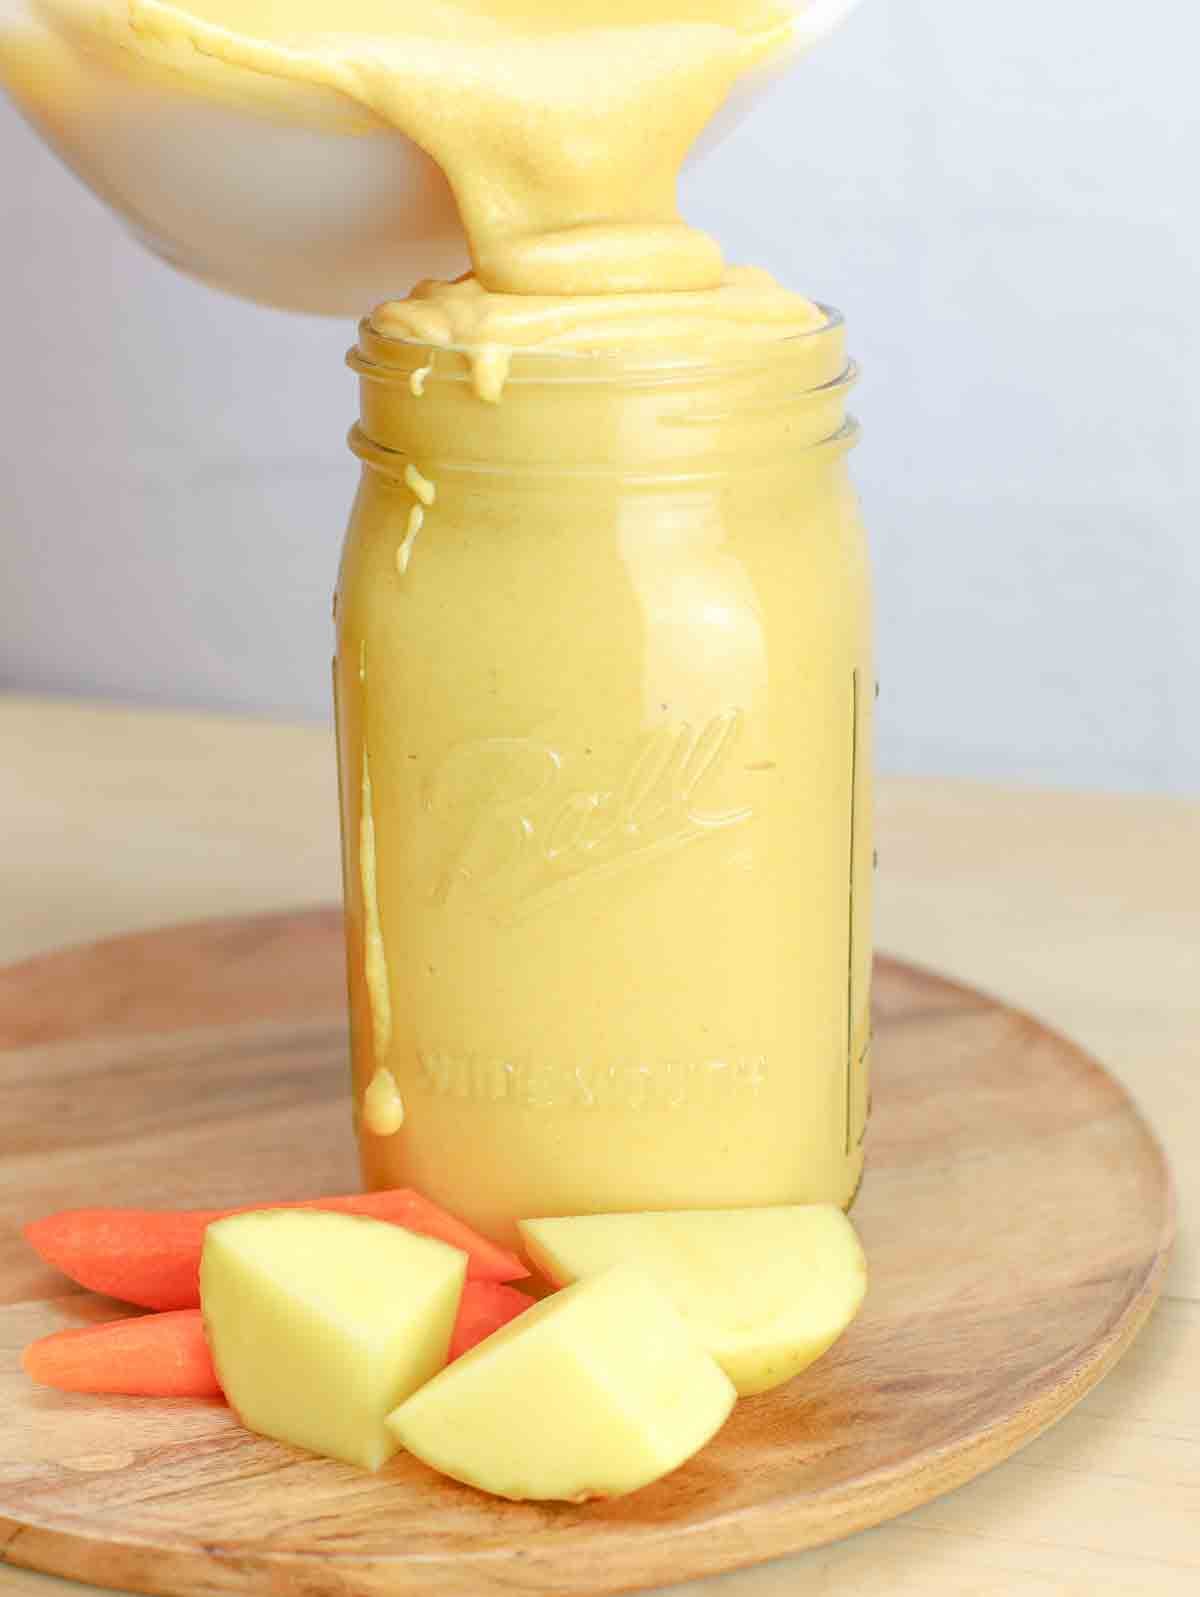
STEP #3: Once the cheese sauce is complete, set it aside. The great thing is that this cheese can be used with so many other recipes, like my creamy vegan broccoli cheddar soup, as a topping for baked potatoes or roasted vegetables, or on veggie pizza.
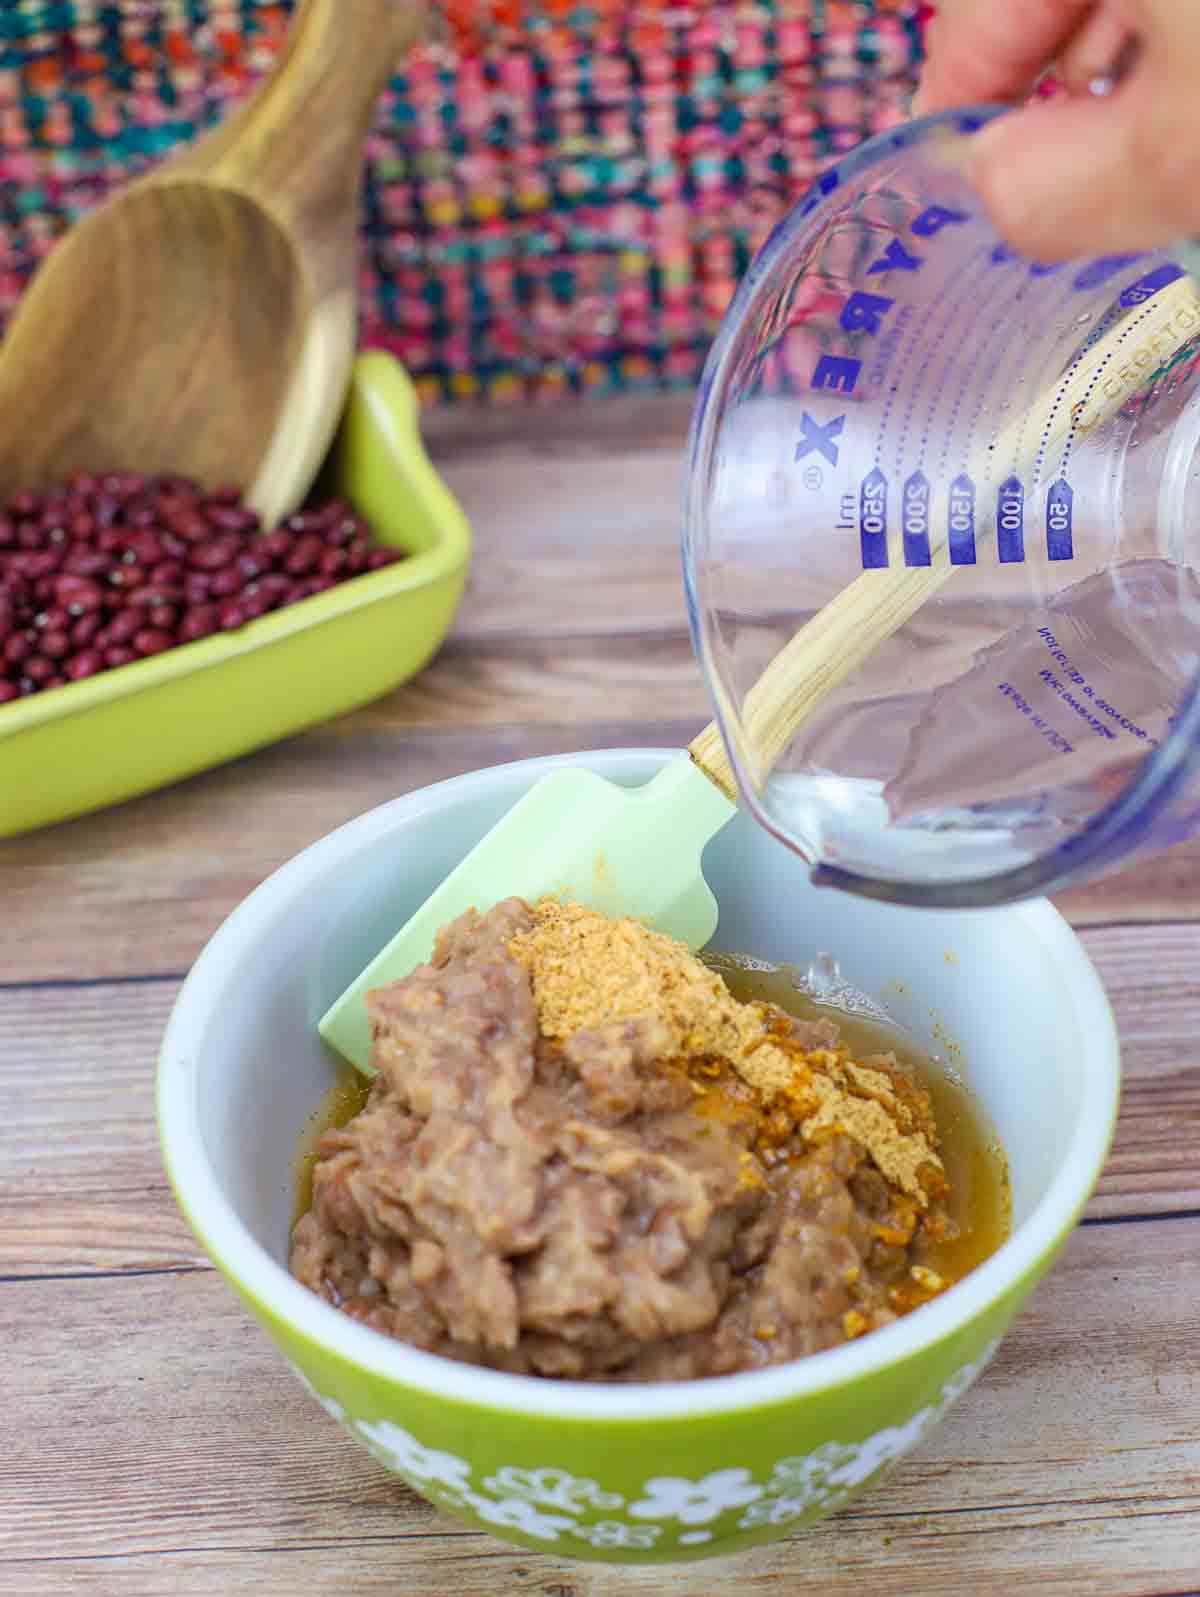
STEP #4: In a medium bowl, combine the refried beans and taco seasoning until well mixed. If the mixture is too thick, add a small amount of warm water and stir until it becomes smooth and creamy.
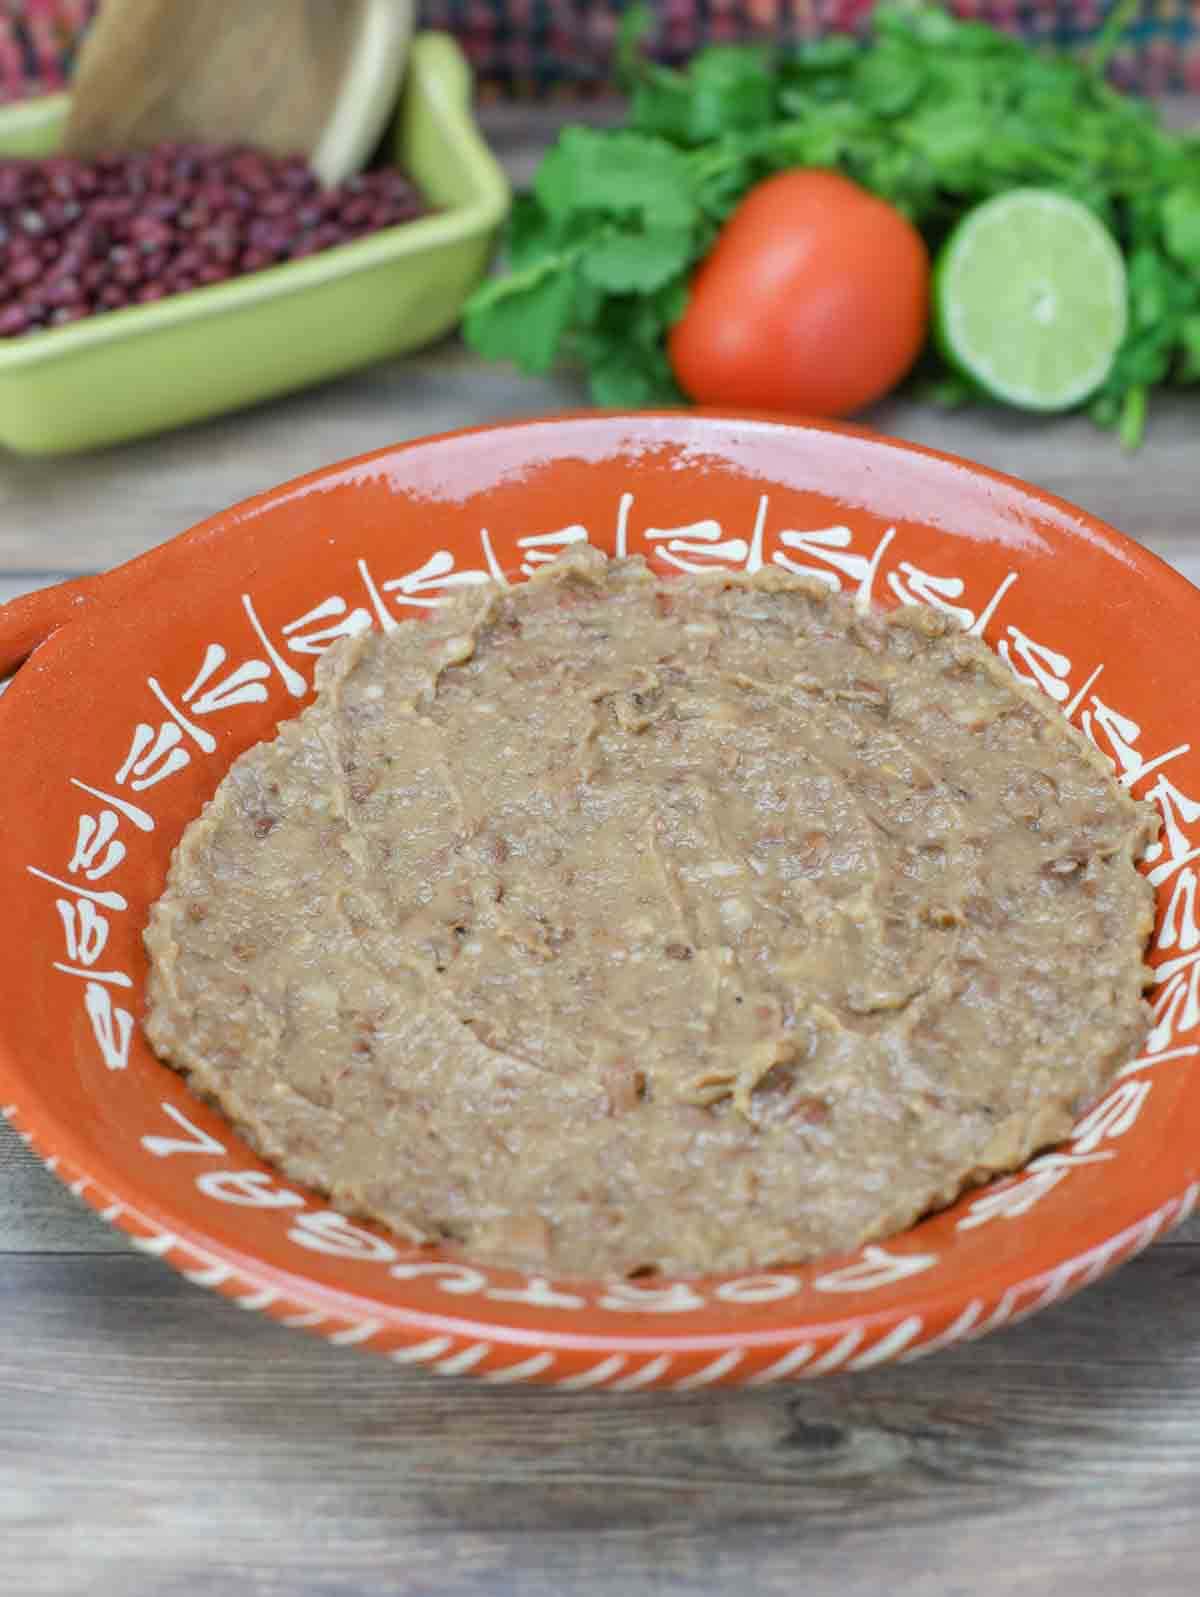
STEP #5: Use a spoon or spatula to spread the beans as the first layer of your dish.
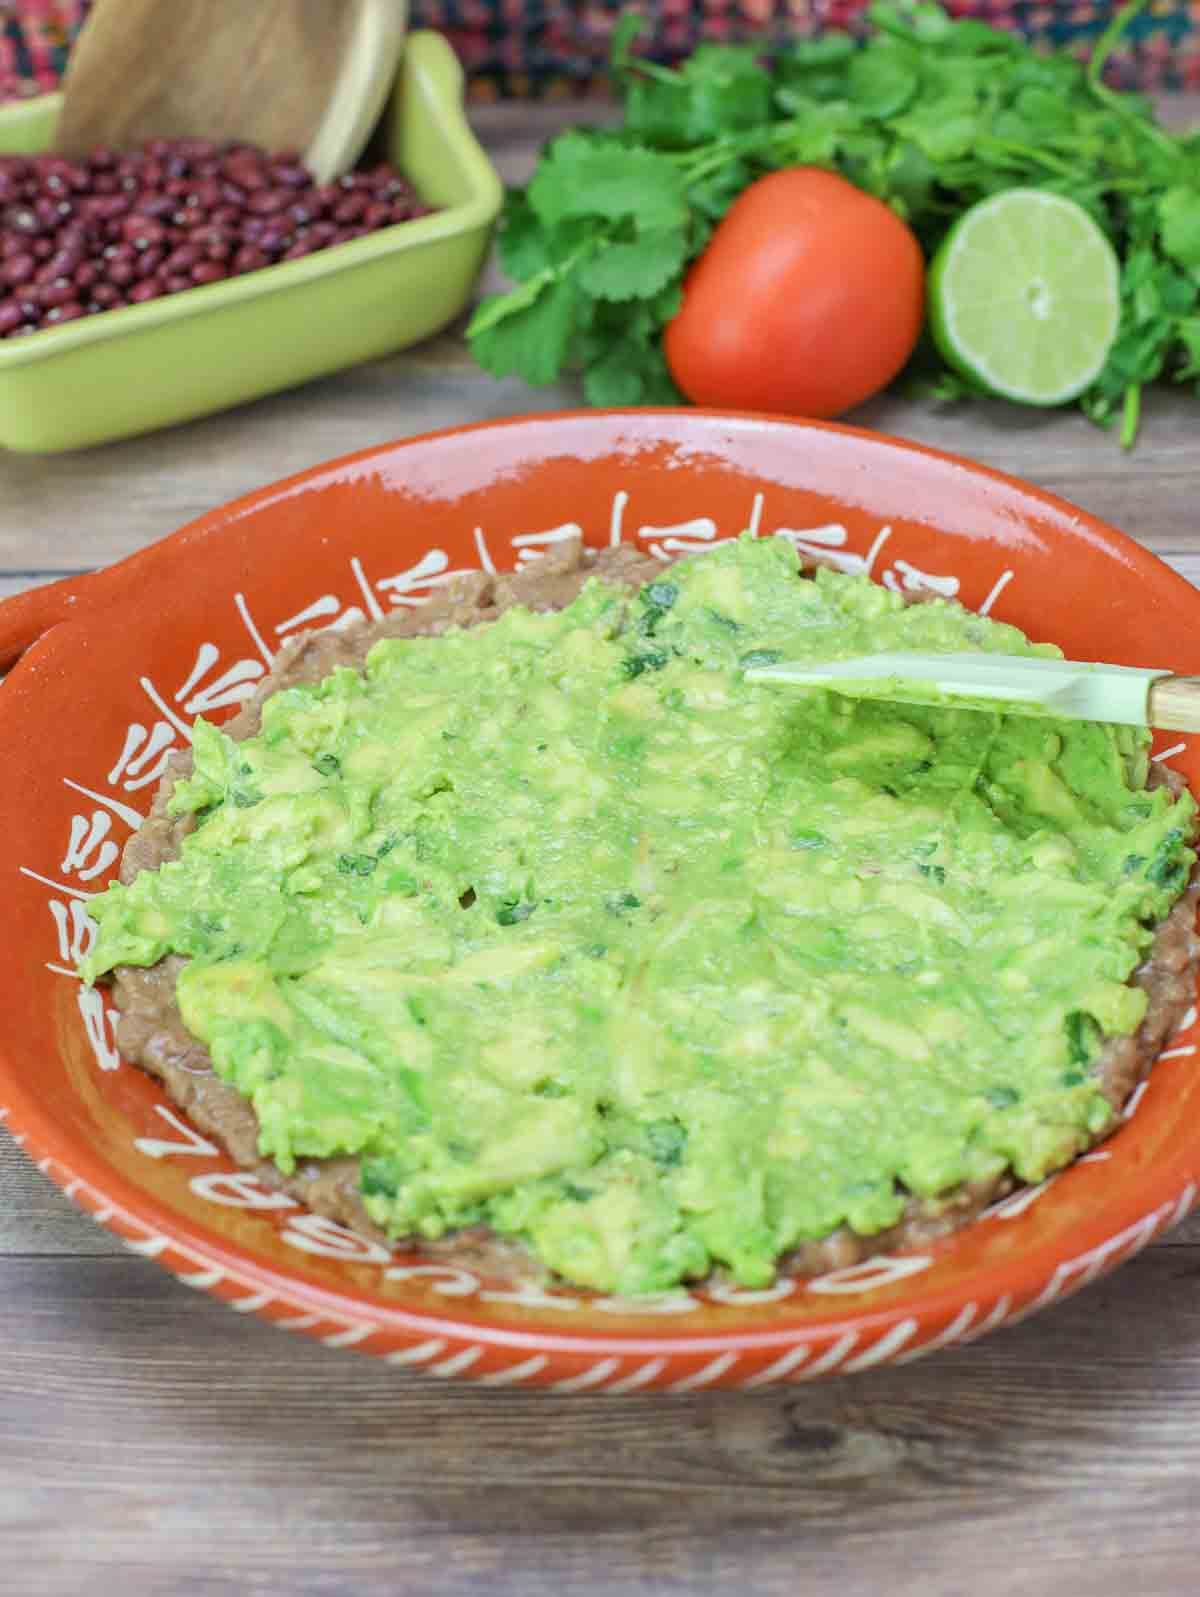
STEP #6: Next, spread your guacamole over the layer of refried beans. Use a light touch so the layers won’t mix together. Chunky guac works well. Use store-bought, or make your own.
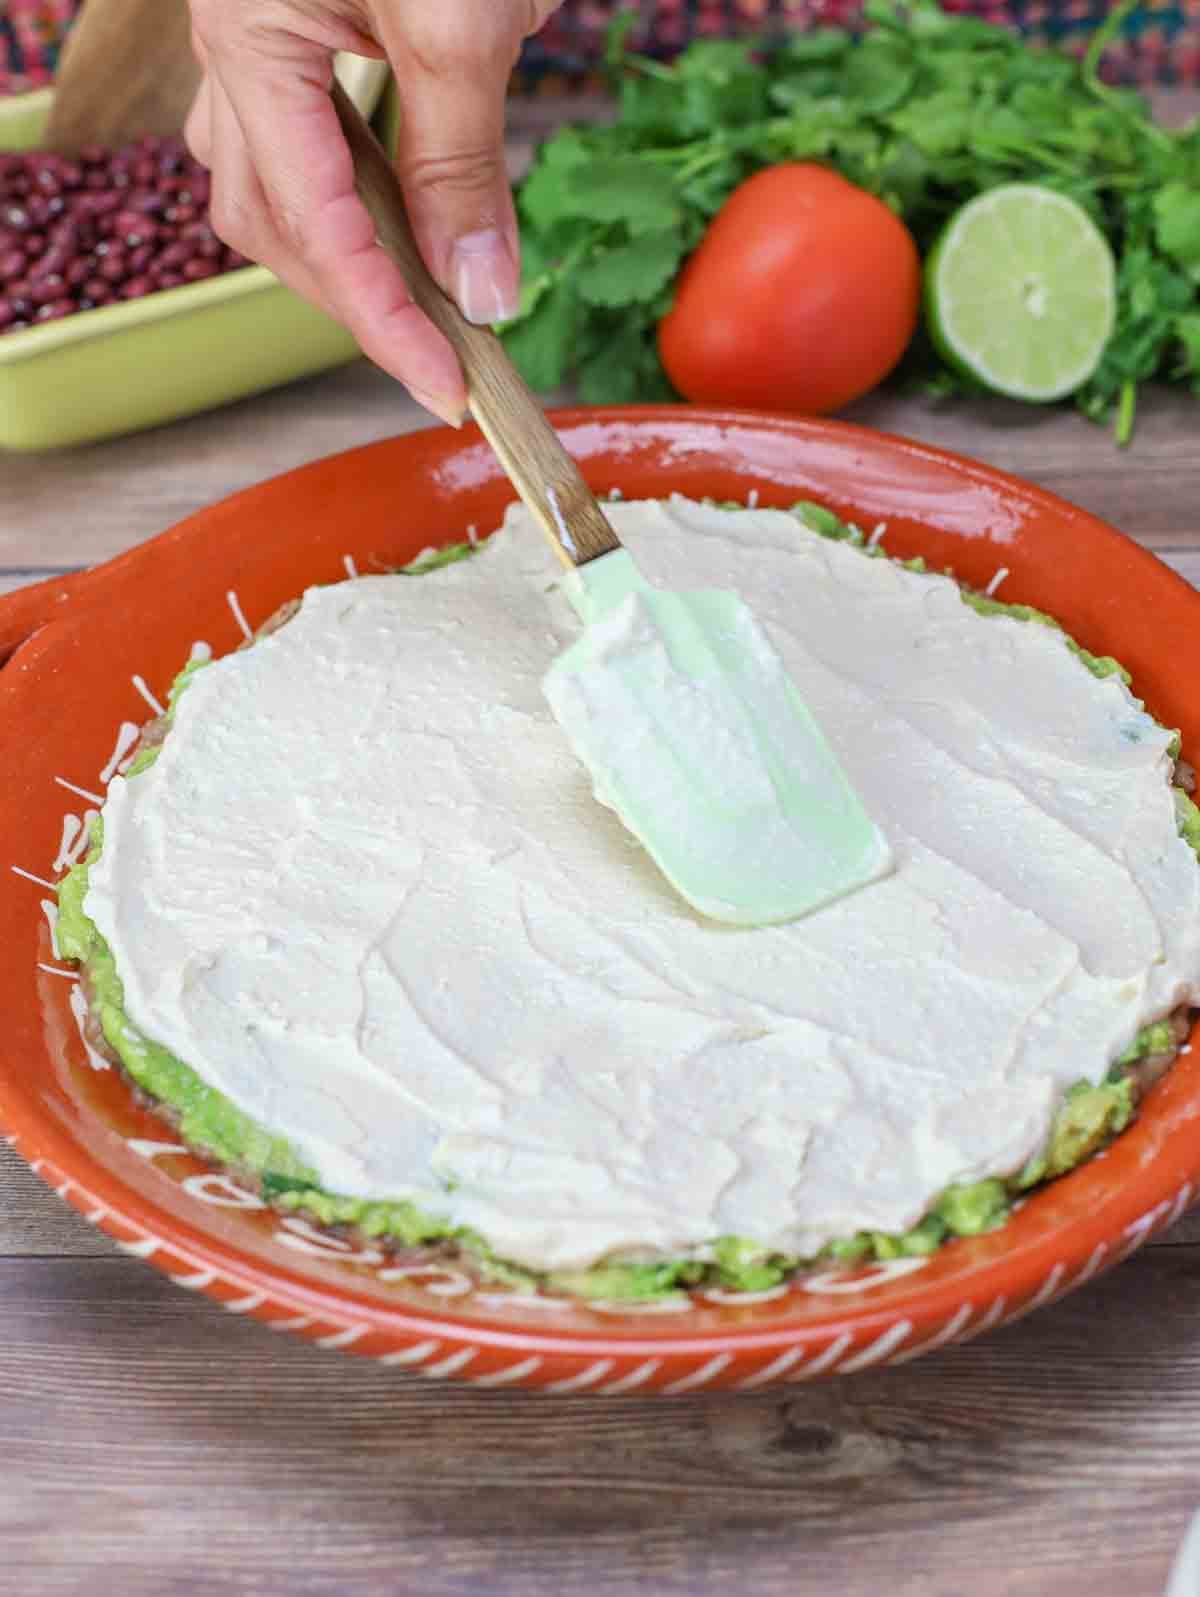
STEP #7: Spread a thick layer of vegan sour cream over the guacamole layer carefully. My 5-minute tofu sour cream is an excellent choice for this recipe.
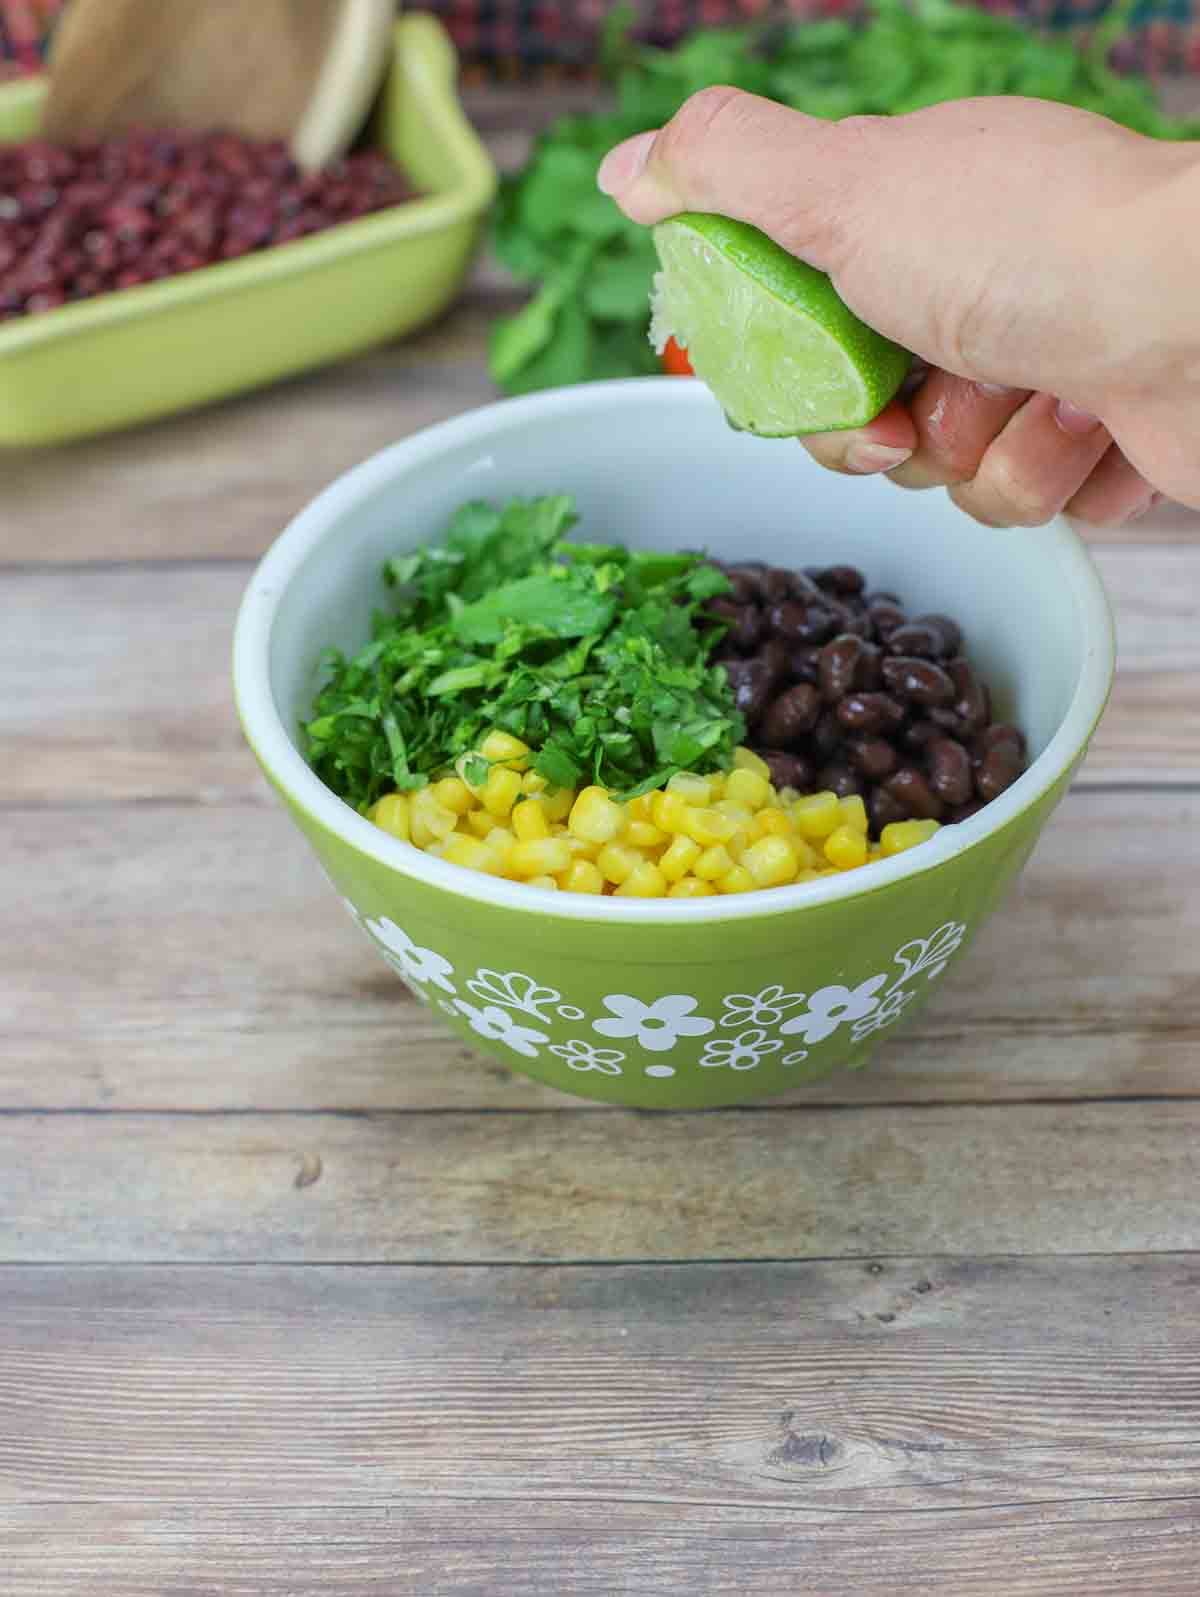
STEP #8: In a small bowl, mix together the black beans, yellow corn, and cilantro, and spritz with
the lime. Sprinkle a pinch of salt and combine well. My preference is frozen corn over canned.
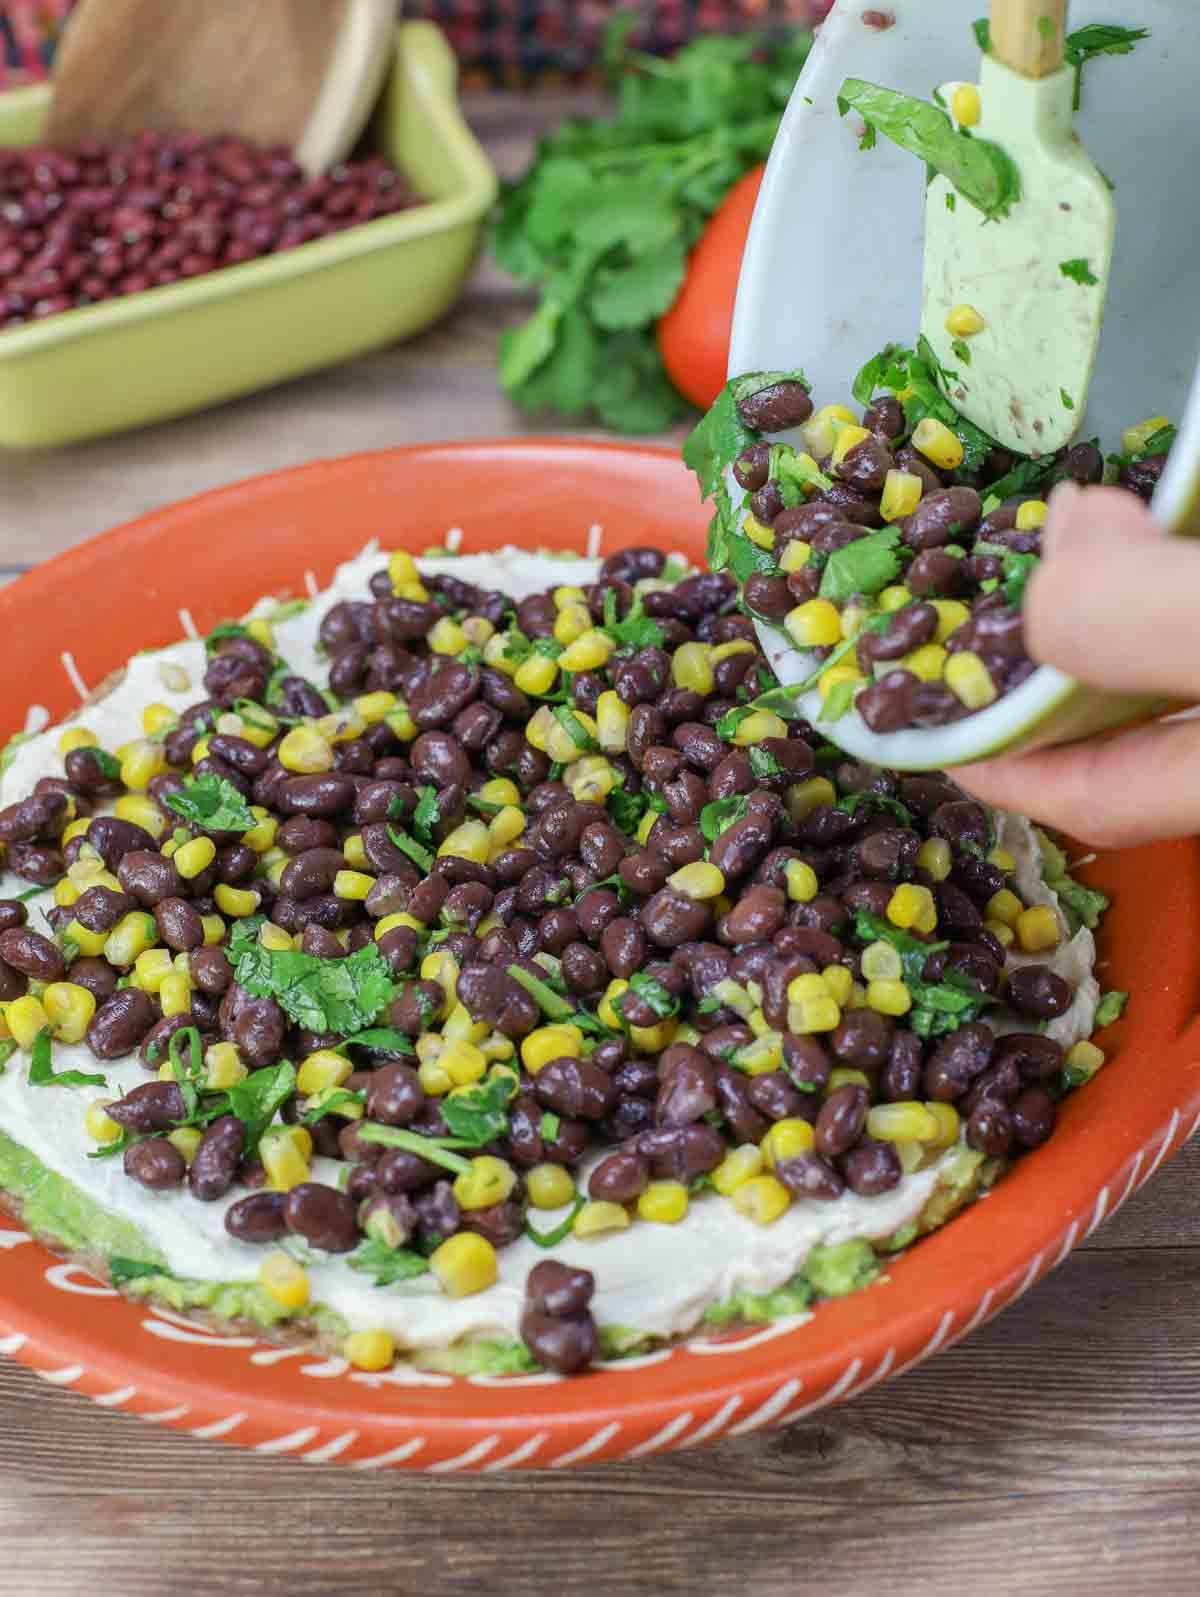
STEP #9: Spread the mixture as your next layer over the sour cream. This adds great texture and heartiness to this dip. It also makes it more filling.
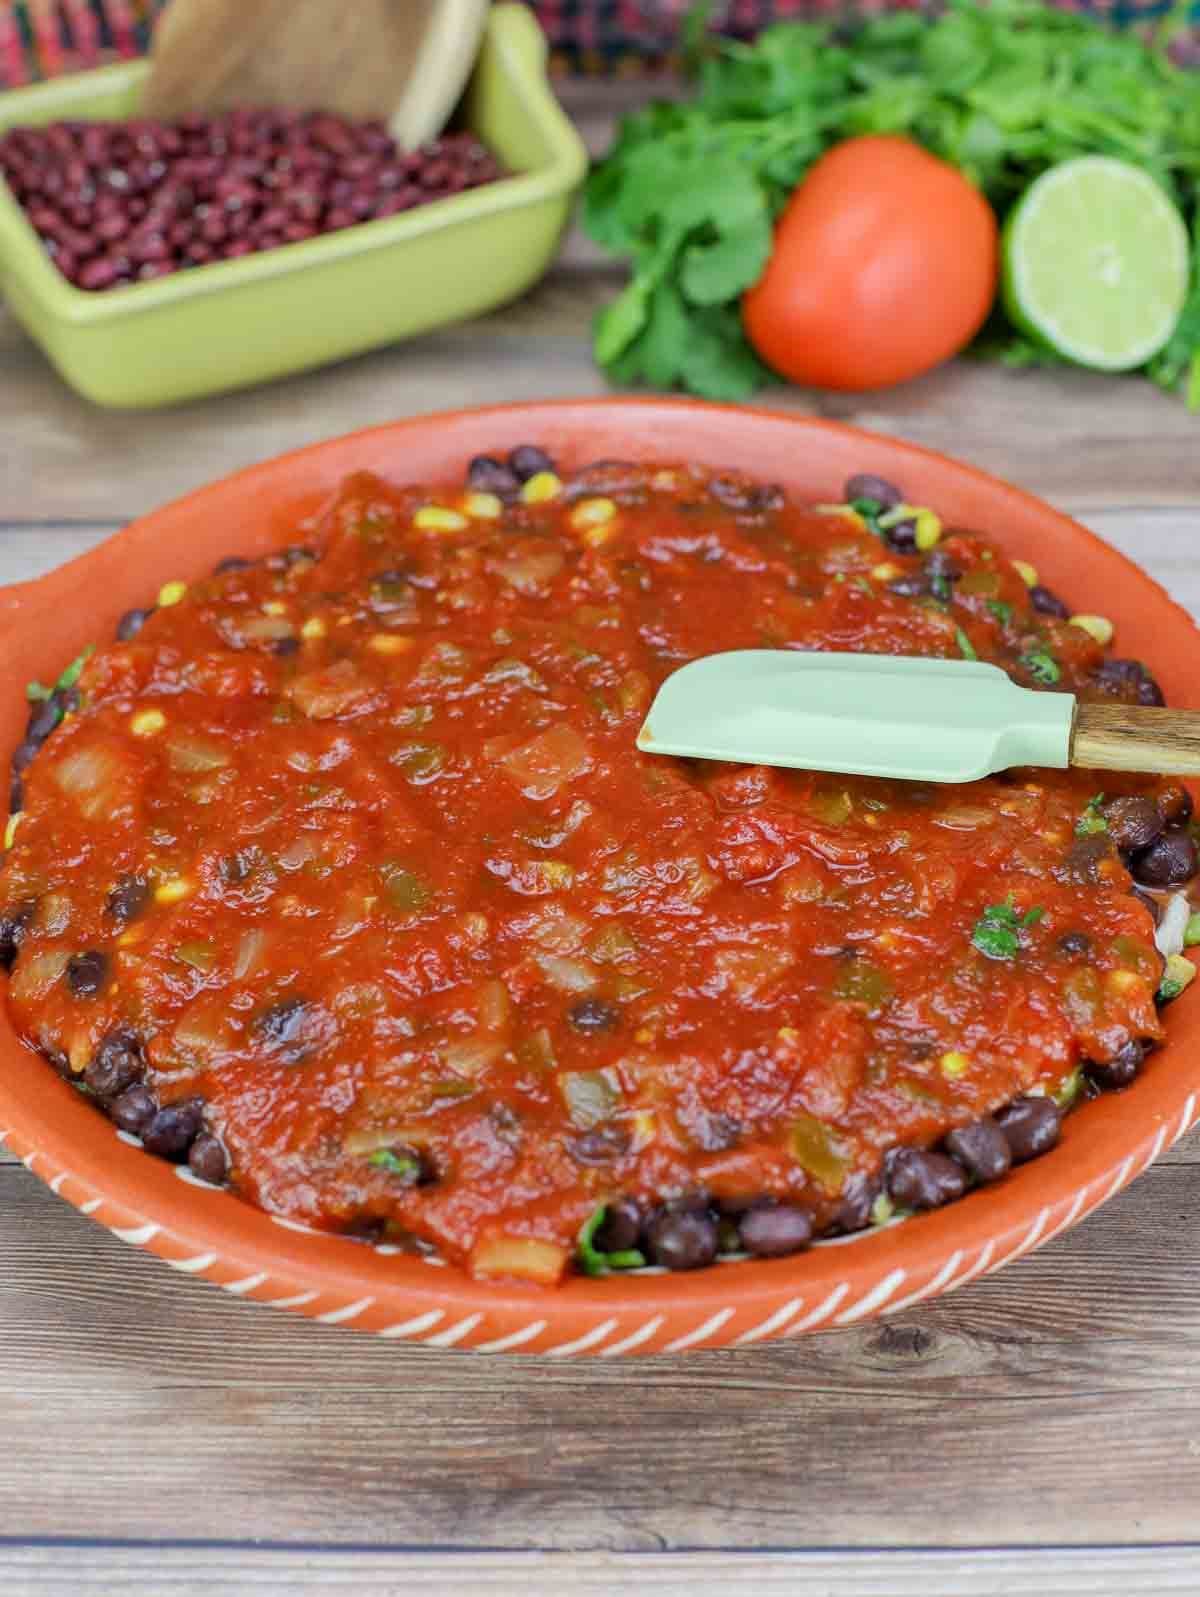
STEP #10: Next, pour the chunky salsa over the top. Again, store-bought is fine, or you can make your ownfresh red chunky salsa if you have time.
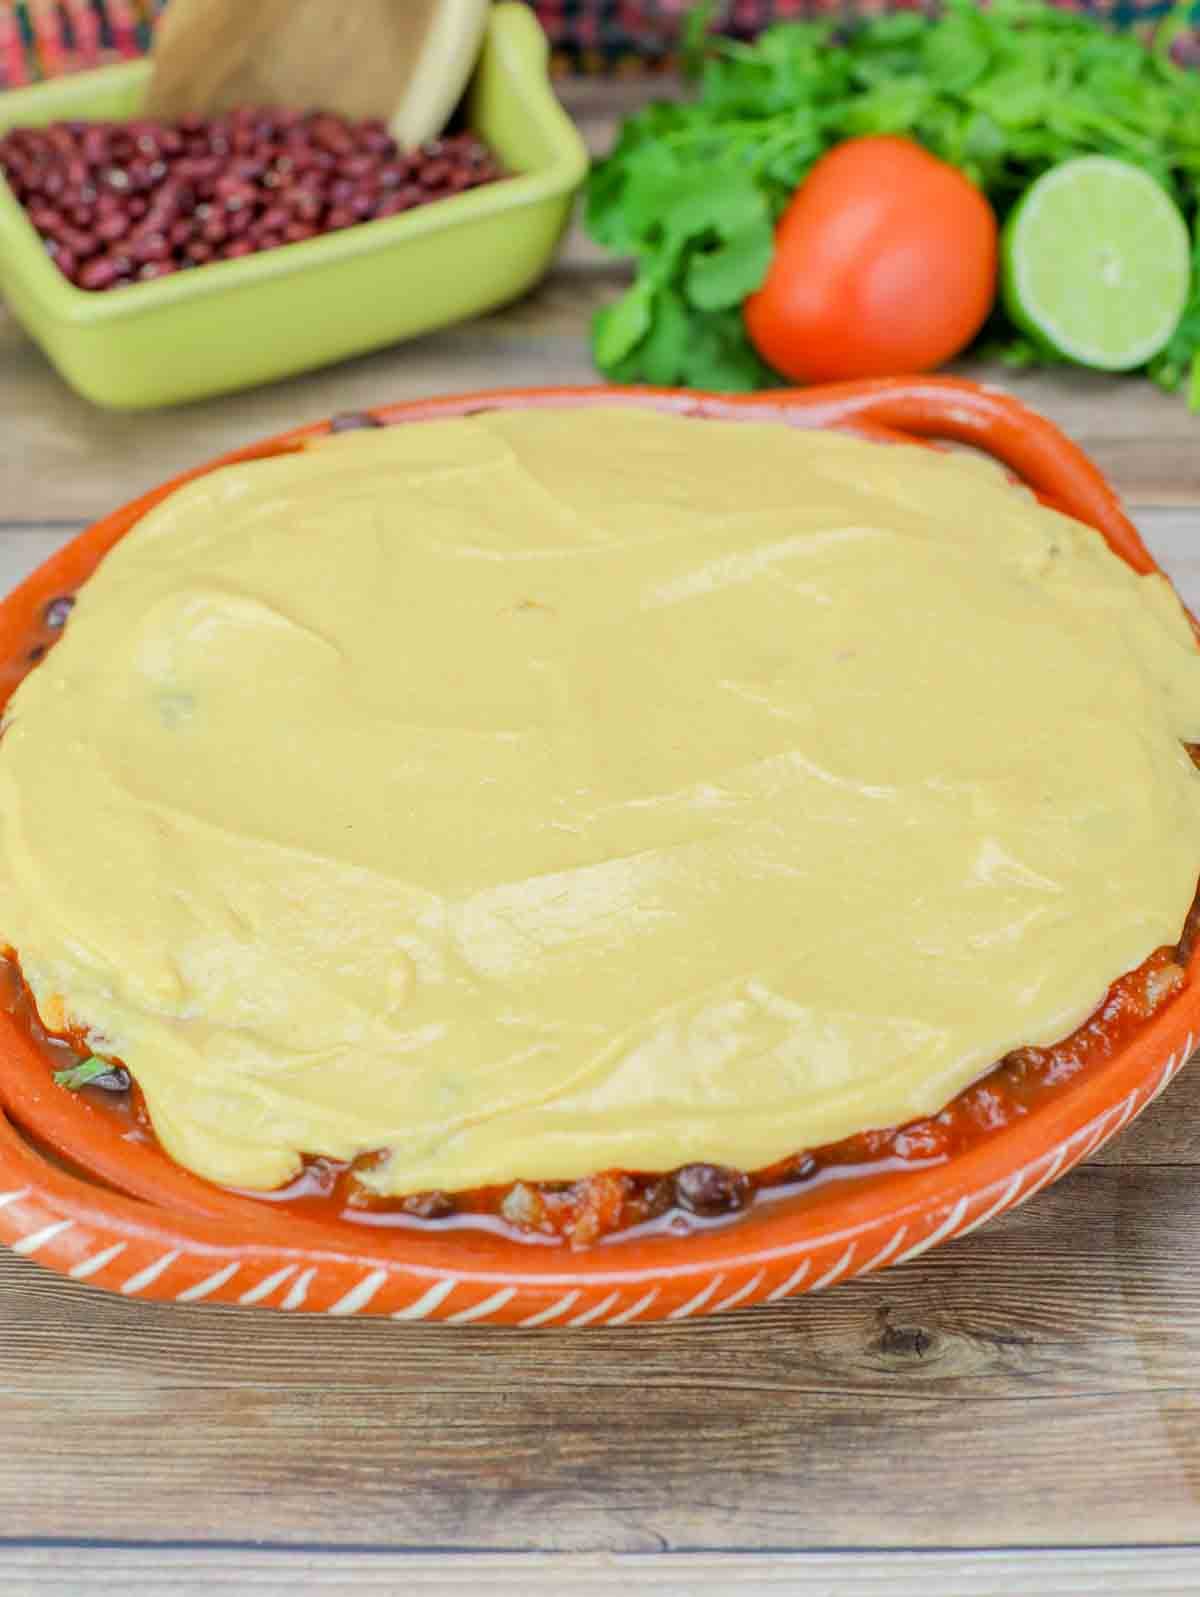
STEP #11: Now, it’s time to top with the creamy homemade vegan cheese sauce (or cashew queso), and carefully spread it around to cover the dish.
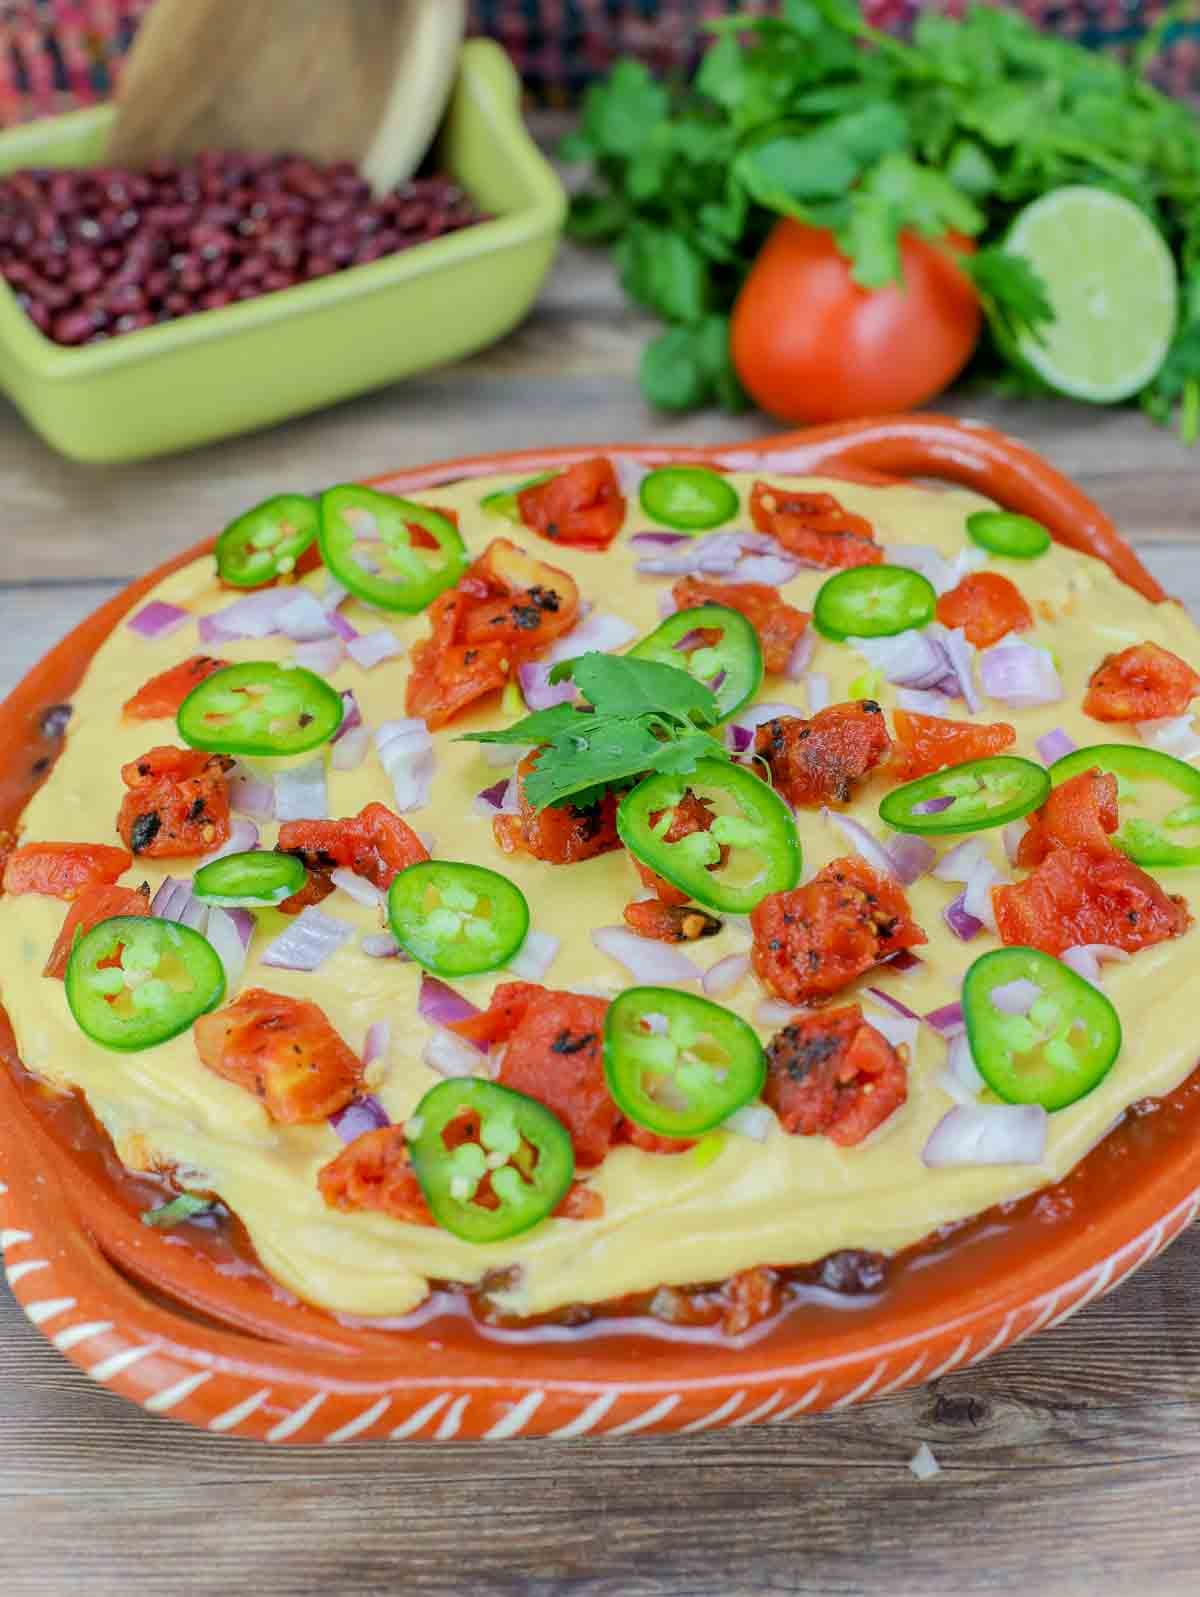
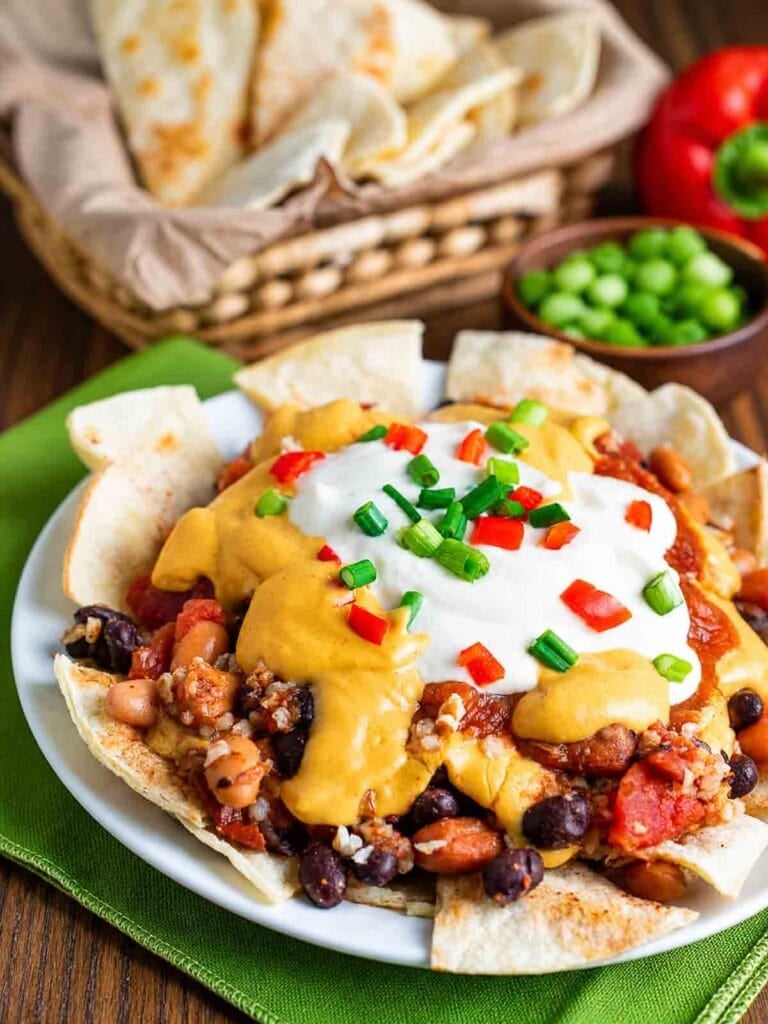
STEP #12: Top with the fire-roasted tomatoes (these are not spicy), diced onion, and Jalapeño if you are braving the extra spice. Serve immediately and enjoy with corn chips like my oil-free baked tortilla chips!
When to Serve This Taco Dip
This layered taco dip is one of those recipes that fits just about any occasion. It’s a natural choice for game days, holiday gatherings, potlucks, and parties where you need something easy, shareable, and guaranteed to disappear fast. Set it out with a big bowl of tortilla chips, and watch everyone gather around—it’s always one of the first dishes to go.
But honestly, it’s not just for special occasions. This taco dip is perfect for casual family nights, weekend snacking, or even a fun make-your-own appetizer spread. Whether you’re hosting a crowd or just craving something flavorful and satisfying, this dip always delivers.
What About Making it ahead?
Making the cheese sauce and other layers ahead of time and storing them separately is actually a great idea, and will cut down on day-of prep time. But, I wouldn’t assemble it too far in advance because the layers will begin to mix with each other, and it won’t look as pretty. It will still taste great, though!
Frequently Asked Questions
7-layer taco dip is perfect with baked tortilla chips, but it’s also great with pita chips, crackers, or fresh veggies like bell peppers and cucumbers. You can serve it as part of a taco night spread with burritos, rice, and beans, or keep it simple as a crowd-pleasing appetizer.
Store leftover 7-layer taco dip in an airtight container in the refrigerator. It will keep for about 3–4 days, but it’s best enjoyed fresh for the best texture and flavor.
Yes! You can absolutely use homemade or canned refried beans in this recipe. Homemade beans add extra flavor and freshness, while canned beans are a quick and convenient option—both work perfectly.
7-layer taco dip can be a healthy option, especially when made with whole food, plant-based ingredients. The refried beans provide a great source of fiber and plant-based protein, helping keep you full and satisfied, while fresh veggies add vitamins and nutrients. Using oil-free and dairy-free ingredients keeps it lighter while still being delicious and satisfying.
More Plant-Based Party Dips You’ll Enjoy

Want to Save This Recipe?
Enter your email & I’ll send it to your inbox. Plus, get great new recipes from me every week!
By submitting this form, you consent to receive emails from EatPlant-Based

7-Layer Taco Dip
Ingredients
Dairy-Free Potato Cheese Sauce
- 1 cup potatoes, peeled and diced
- 1/4 cup carrots, diced
- 1/4 cup onion, diced
- 1 cup broth from cooking the veggies
- 1/2 cup raw cashews (or cooked white beans)
- 1/4 cup nutritional yeast flakes
- 1 tablespoon lemon juice
- 1 teaspoon salt
- 1/2 teaspoon garlic powder
- 1 pinch paprika
- 1/2 pinch cayenne pepper
7-Layer Taco DIp
- 3 cups refried beans or make fresh (this equals 2-15 oz cans)
- 3 teaspoons taco seasoning
- 1.5 cups guacamole
- 1 cup dairy-free sour cream (see my tofu sour cream recipe)
- 1 cup chunky salsa
- 2 cups dairy-free cheese sauce (recipe below)
- 1 cup black beans, drained and rinsed
- 1 cup yellow corn (frozen not canned)
- 1/2 cup cilantro, finely chopped
- 1/2 lime
- 1/2 teaspoon salt
- 1/2 cup fire-roasted tomatoes (drained)
- 1/4 cup purple onion, diced
- 1/2 Jalapeño, finely chopped, optional
Instructions
- You will want to make the dairy-free cheese sauce first thing. It’s really easy to make and even freezes well. I usually already have some on hand in my freezer, which shortens the steps to making any of my recipes that require cheese, such as my hash brown casserole, dairy-free broccoli casserole, and vegan scalloped potatoes. If you're in a hurry, my 5-minute cashew queso can be substituted.Making this terrific cheese sauce is as simple as boiling a pot of potatoes, onions, and carrots. Then, drain them and add them to a blender with cashews (or white beans), spices, and blend until smooth.
- I have a Vitamix blender and don’t take the time to soak my cashews. It is powerful, and everything that goes into it comes out creamy. However, if your blender isn’t jet engine speed, soaking the cashews in warm water for at least 30 minutes before adding to this recipe will help this recipe come out more creamy. Once the cheese sauce is complete, set it aside.
- In a medium bowl, combine the refried beans and taco seasoning until well mixed. If the mixture is too thick, add a small amount of warm water and stir until it becomes smooth and creamy.
- Use a spoon or spatula to spread the beans as the first layer of your dish, followed by a layer of guacamole, and then dairy-free sour cream. I have included detailed instructions with photos of how to layer this above.See the serving bowl and pan options below in the Notes.
- In a small bowl, mix together the black beans, yellow corn, and cilantro, and spritz with the lime. Sprinkle a pinch of salt and combine well. My preference is frozen corn over canned.Spread the mixture as your next layer over the sour cream. This adds great texture and heartiness to this dip. It also makes it more filling.
- Next, pour the chunky salsa over the top. Again, store-bought is fine, or you can make your own fresh red chunky salsa if you have time.
- Now, it's time to top with the creamy homemade vegan cheese sauce (or cashew queso), and carefully spread it around to cover the dish.
- Top with the fire-roasted tomatoes (these are not spicy), diced onion, and Jalapeño if you are braving the extra spice. Serve immediately and enjoy with corn chips like my oil-free baked tortilla chips!Storage instructions above.
Video
Notes
Nutrition
Disclaimer
To obtain the most accurate representation of the nutritional information in a given recipe, you should calculate the nutritional information with the actual ingredients used in your recipe, using your preferred nutrition calculator. You are solely responsible for ensuring that any nutritional information provided is accurate, complete, and useful.

About the Chef
Sarai Leo Matsui enjoys creating delicious Mexican, American, and Japanese dishes that bring together flavors from the cultures she loves. She is bilingual, a talented photographer, and loves thrifting and discovering new treasures along the way. Sarai lives in Western North Carolina with her husband and young daughter, where she enjoys cooking, creating, and sharing food with her family. Read More…
My niece, Sarai, is the chef behind this recipe. She brought a whole dish over for my husband and me to enjoy. It is FANTASTIC! I hope you make it and enjoy it as much as we do. Please leave me a comment here and share your feedback with a star rating as well.