
How to Make the Ultimate Vegan Charcuterie Board
This Vegan Charcuterie Board will be a huge hit at your next party or gathering of friends and family. It’s perfect for entertaining during the holidays or even game night!

Want to Save This Recipe?
Enter your email & I’ll send it to your inbox. Plus, get great new recipes from me every week!
By submitting this form, you consent to receive emails from EatPlant-Based
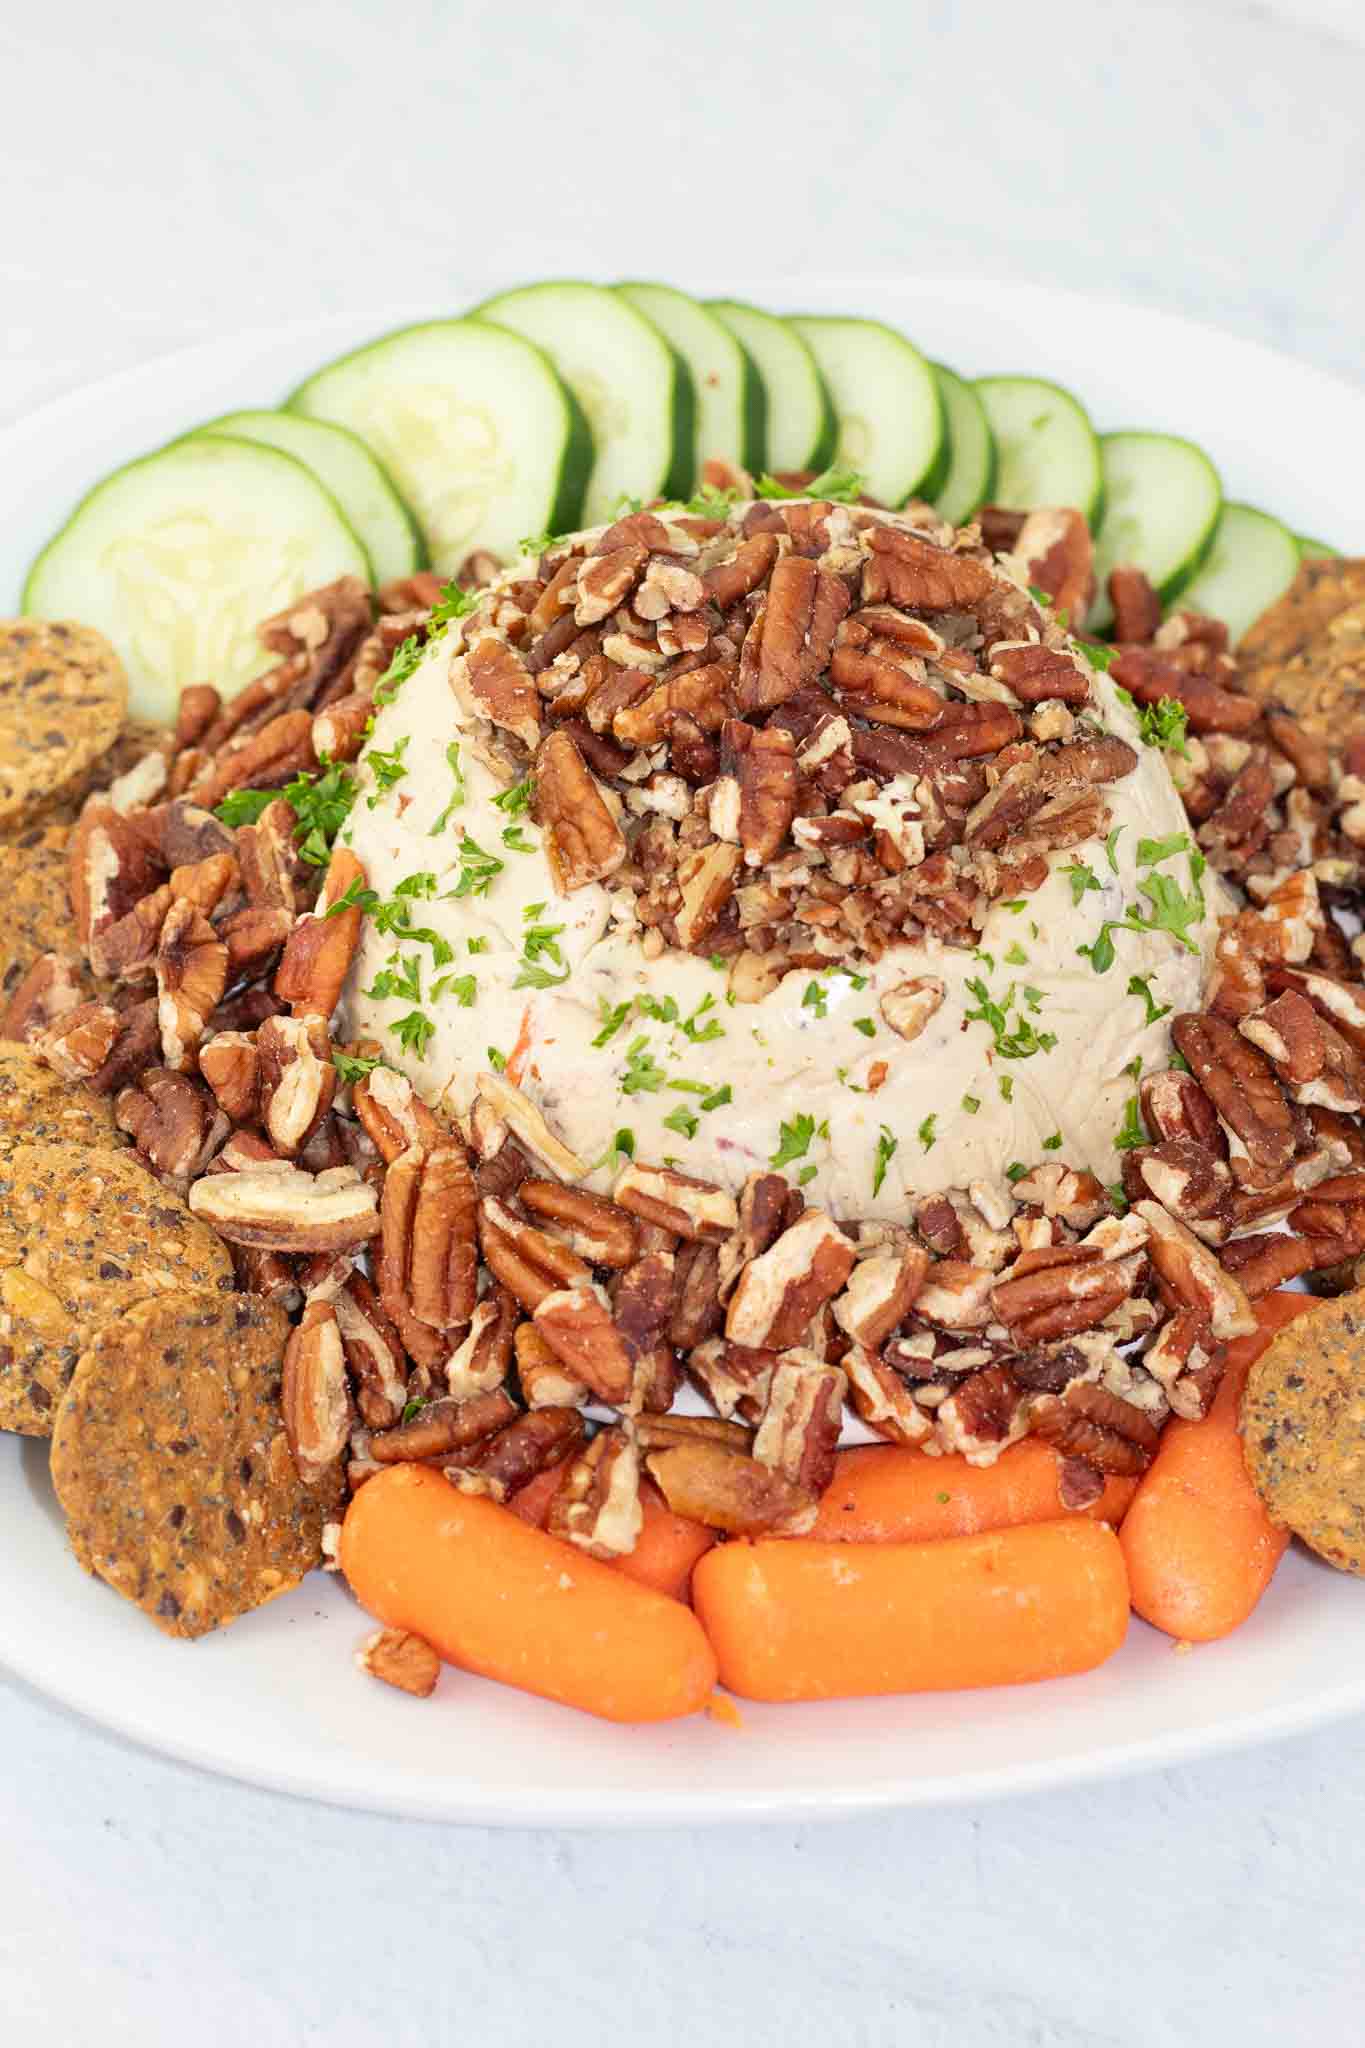
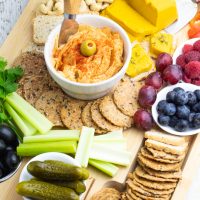
Loaded with hummus, oil-free vegan cheese, crackers, olives, veggies, and fruit, these vegan snack boards will be the life of the party! During the last holiday season, I used my cream cheese recipe to come up with an amazing vegan cheese ball that is perfect for making a charcuterie board.
In the whole food, plant-based (WFPB) community, we often talk about eating the rainbow because of all of the colorful foods we enjoy. There is no better demonstration of that than with a vegan snack board like this.
Reasons you will love this to guests
- Colorful and Visually Stunning: A vegan charcuterie board is a feast for the eyes, filled with a vibrant array of fresh fruits, vegetables, nuts, and homemade plant-based cheeses, making it a beautiful centerpiece for any gathering.
- Diverse and Customizable: Whether catering to different dietary preferences or simply getting creative, a vegan charcuterie board is highly customizable, allowing you to mix and match an endless variety of plant-based options.
- Perfect for Entertaining: Impress your guests with a delicious and eco-friendly spread that’s perfect for parties, game days, picnics, or casual get-togethers, proving that vegan options can be both satisfying and sophisticated.
What is a charcuterie board?
Charcuterie is a French term that refers to a method for preserving meats such as bacon, ham, and sausage. People began creating charcuterie boards by serving an assortment of snack foods that included processed meats along with crackers, cheese, dips, and other finger-type foods.
Over the years, the term has grown to include many different types of charcuterie boards that resemble more of a smorgasbord and can even incorporate vegan versions like the ones displayed here.
Vegan ingredient options
Though there are no set rules for what should be served on a vegan charcuterie board, the main goal is that the food should be healthy, beautiful, and delicious. These are some of the items I like to include.
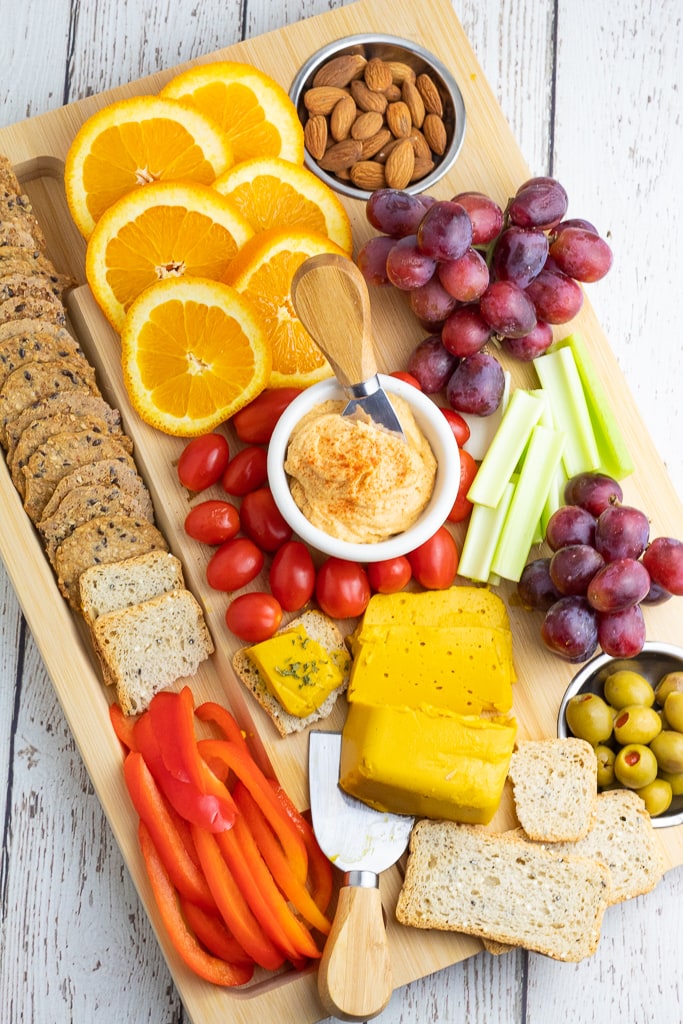
- Hummus- It’s such a simple ingredient that can be eaten on crackers, veggies, and crusty bread. There are so many different oil-free varieties to choose from like Basic Garlic Healthy Hummus, Roasted Red Pepper Vegan & Oil-Free Hummus, Italian Oil-free Hummus, and even Edamame Hummus.
- Vegan Cheese– Though a charcuterie board doesn’t have to include cheese, I think it’s a great accompaniment because they add so much flavor like this Sliceable Vegan Cheese or even my spreadable Ricotta Tofu Cheese. Most recently my Dairy-Free Cheese Ball has taken center stage on charcuterie boards for our family celebrations because it is a show-stopper with all kinds of eaters.
- Fresh Vegetables- There are so many great raw veggie options that include colorful red, yellow, orange, and green bell peppers, cherry tomatoes, celery and carrot sticks, broccoli, cauliflower, radishes, cucumbers, and anything else you can think of. The more colorful your board is, the better.
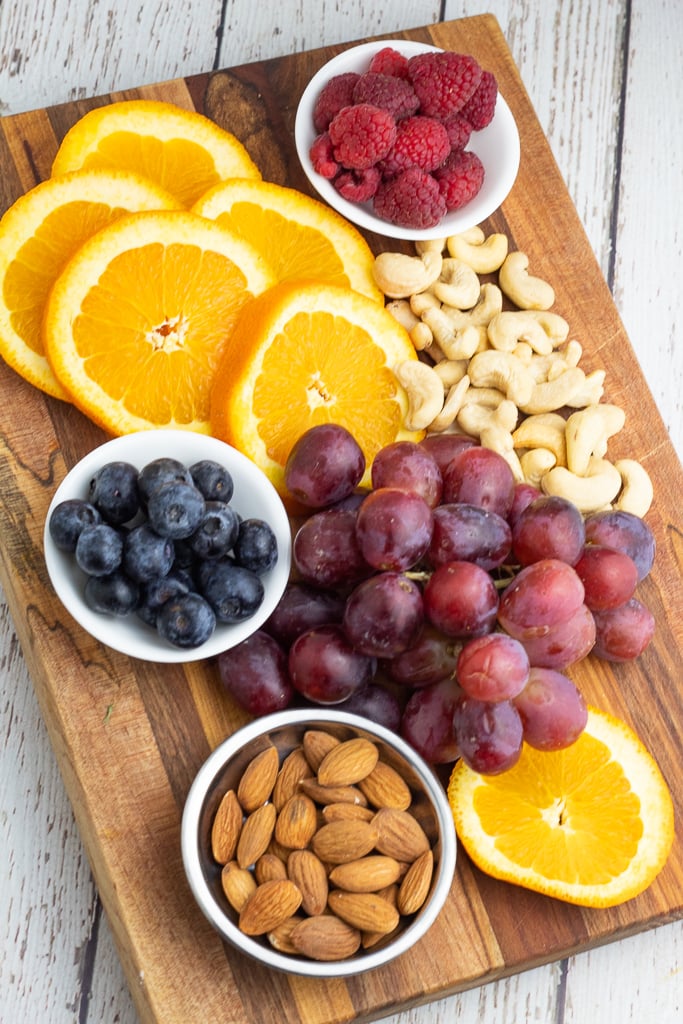
- Fruit- Who doesn’t love fruit? Grapes are always a great option, as well as berries such as blueberries, strawberries, and raspberries. Oranges are so bright and colorful too. Personally, I wouldn’t include apple slices or bananas because they quickly begin to get brown spots.
- Olives- Some WFPB folks avoid olives due to their high-fat content, but I think they are a terrific option for a snack board like this. Choose green, black, or any type of olives desired.
- Nuts- Whether it’s almonds, cashews, or some other kind of nut, they make great charcuterie board options.
- Pickels- Those baby dills are perfect or even the bread and butter variety.
- Crackers- Personally, I love oil-free Mary’s Gone Crackers that I find at my local grocery store or online. Melba toast is another good option.
- Bread- Crusty bread is the best choice for a board like this in my opinion, and chunks of sourdough bread are excellent.
- Roasted Chickpeas- To add a little more crunch, roasted chickpeas like my Salt & Vinegar Crunchy Chickpeas or Air Fryer Roasted Chickpeas are fabulous additions.
When to serve a charcuterie board
Charcuterie boards are great to serve for so many occasions such as holidays, birthday parties, bridal or baby showers, or game nights. I’ve even heard of some families calling it dinner on movie nights together.
What size board should be used?
Truthfully, the size and type of board are totally up to you and will depend on the size of the crowd you’ll be feeding on it.
You can purchase a special charcuterie board that comes with little bowls, slots, and utensils. Or, you could just use a cutting board that you already have on hand.
The size will depend on the number of people being served. If it’s just a couple of people, something like an 8″x8″ or 9″x13″ will work just fine. If it’s a larger crowd, you might want to go with an 18″x24″ board that should accommodate up to 10 people or more if there are other dishes being served.
How to arrange it
- Large items- Typically, it’s best to start by placing the larger items such as bowls of hummus and blocks of vegan cheese on the board.
- Medium-size items- Next, anything in a jar or small pinch-type dish can be added. This would include things like olives and nuts.
- Small stuff- Finish up by arranging any loose items like veggies, fruit chunks, and crackers.
Pro tips & suggestions
- Keep it dry- Foods that tend to hold juice should be served in a bowl. Things like olives, pickles, and artichoke hearts will cause crackers and bread to become dampened if they are loose on the board.
- Spread colors- Try to spread out the foods that are similar in color such as red bell peppers and cherry tomatoes so that the color is balanced on the board.
- Don’t go overboard- Believe me, there are SO many food items to choose from that it will be hard to narrow it down. Don’t get all crazy with trying too many different types of food. Keep it simple.

For those of you new to the whole food plant-based lifestyle, we’ve created a FREE 7-Day Plant-Based Menu Planner to help you get started!
If you try this recipe, please let us know how you like it by rating it and leaving a comment. We love to hear from you!
Want to Save This Recipe?
Enter your email & I’ll send it to your inbox. Plus, get great new recipes from me every week!
By submitting this form, you consent to receive emails from EatPlant-Based
How to Make the Ultimate Vegan Charcuterie Board
Ingredients
Vegan Cheese Options
- vegan cheese ball homemade
- cheese block homemade
- ricotta
Spreads & Dips
Veggies
- baby carrots
- celery sticks
- colorful bell pepper sices red, orange, yellow, green
- raddish slices
- cucumber slices
- broccoli florets
- cauliflower chunks
Fruits
- grapes red, green, blue
- berries blueberries, raspberries, strawberries
- orange slices
Crackers & Bread
- oil-free crackers
- melba toast
- sourdough bread chunks
Other items
- Nuts almonds, cashews, pistachios
- olives
- Roasted chickpeas
- pickels
Instructions
- Prep Work
- Decide on the size of board you'll be using based on how many people will be served. For help deciding, check out my suggestions in the Recipe Notes section below.
- Prepare any items that are being made from scratch such as hummus, vegan cheeses, dips. I like to do this a day ahead of time.
- Prep all of the veggies and fruit by washing and slicing them into chunks.
- Assemble the Board
- Large items- Typically, it’s best to start by placing the larger items such as bowls of hummus and blocks of vegan cheese on the board.
- Medium size items- Next, anything in a jar or small pinch-type dish can be added. This would include things like olives and nuts.
- Small stuff- Finish up by arranging any loose items like veggies, fruit chunks, and crackers.
Video
Notes
- Keep it dry- Foods that tend to hold juice should be served in a bowl. Things like olives, pickles, and artichoke hearts will cause crackers and bread to become dampened if they are loose on the board.
- Spread colors- Try to spread out the foods that are similar in colors such as red bell peppers and cherry tomatoes so that the color is balanced on the board.
- Don’t go overboard- Believe me, there are SO many food items to choose from that it will be hard to narrow it down. Don’t get all crazy about trying too many different types of food. Keep it simple.
Disclaimer
To obtain the most accurate representation of the nutritional information in a given recipe, you should calculate the nutritional information with the actual ingredients used in your recipe, using your preferred nutrition calculator. You are solely responsible for ensuring that any nutritional information provided is accurate, complete, and useful.
I love this idea! A great alternative to the processed meats/cheeses that are typically featured on charcuterie boards. I’m planning to do a blog on this topic and will definitely include a link to this page!
Hi Cyd- Thank you! I can’t wait to read your article, so please send me a link when you get it up. I’ll share it on my social media platforms.
Terri, can you tell me how long this will keep in the fridge? Just wondering as far as making ahead of time for the holidays, and also if it can be frozen?
Kim- Since there are so many different items that you can use on a charcuterie board, I suggestion making it only a few hours ahead of time. If you make the sliceable cheese ahead and store it in an airtight container seperately, it will last 7-10 days.