
Easy Cashew Cheese | Mozzarella
This amazingly simple Vegan Cashew Cheese is deliciously stretchy and gooey on pizza, French onion soup, and so many other recipes. It’s the perfect dairy-free cheese recipe that also happens to be gluten-free.
Want to Save This Recipe?
Enter your email & I’ll send it to your inbox. Plus, get great new recipes from me every week!
By submitting this form, you consent to receive emails from EatPlant-Based
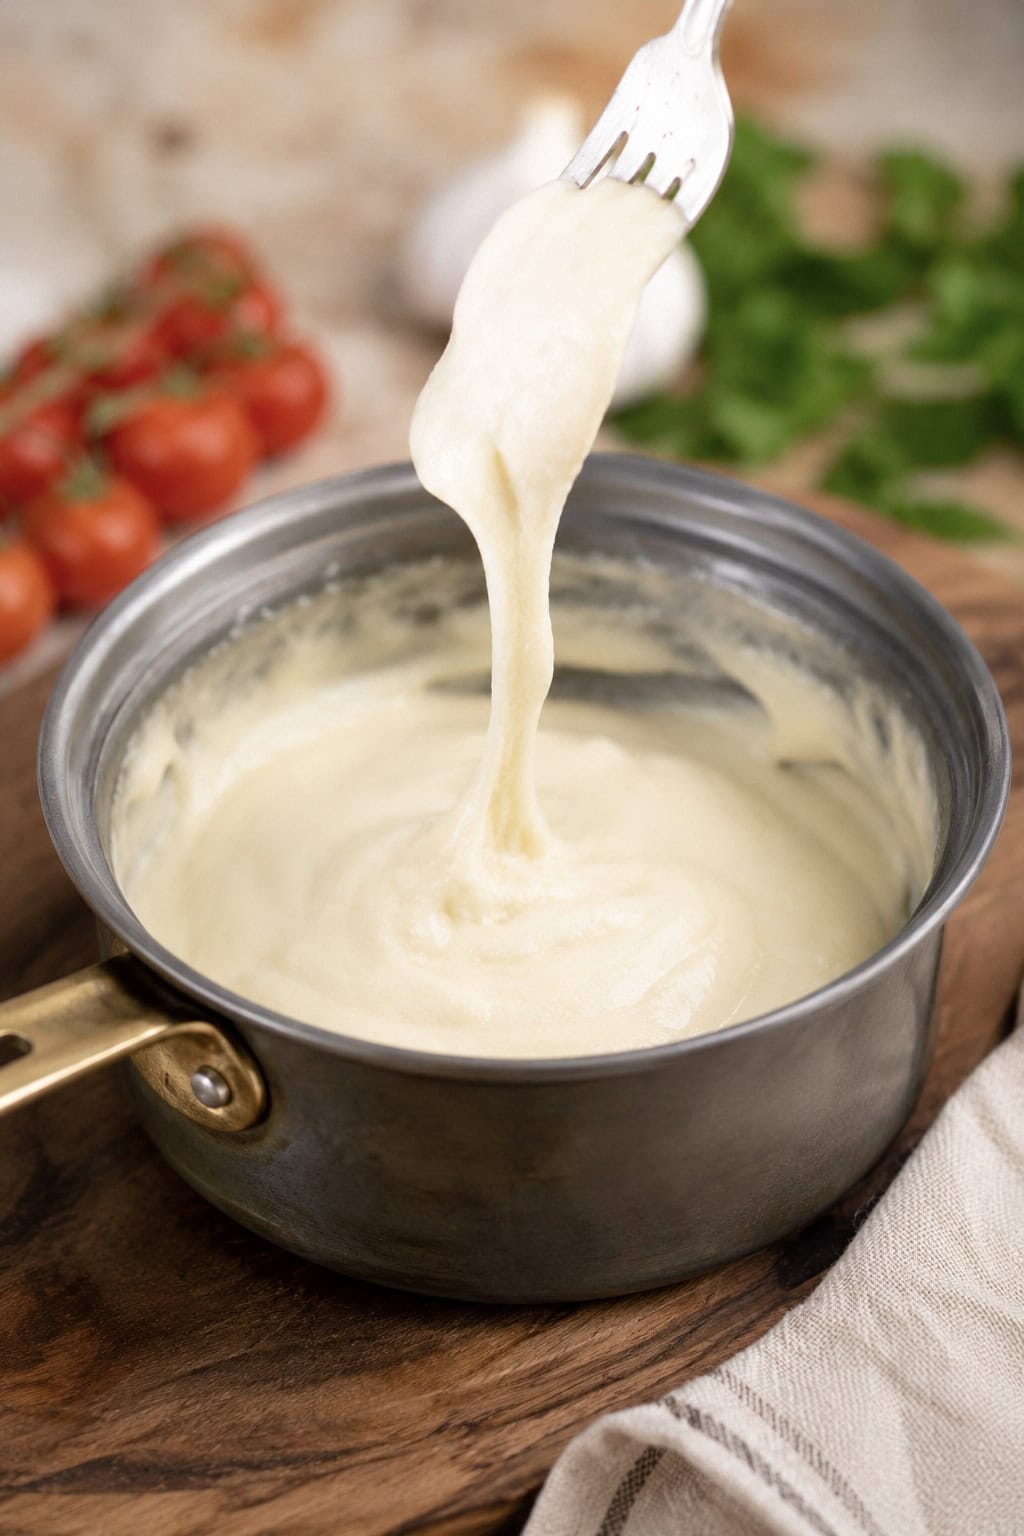
Is it really possible? Homemade cashew cheese that requires only a handful of ingredients and no oil that stretches like mozzarella? YES, it is! I’m not going to kid you, this cashew cheese recipe is one of the best things since sliced bread, in my humble opinion.
This stuff will surprise you, guaranteed. Not only is it delicious, but it actually has a stretch to it like mozzarella cheese. Seriously! There is even a nut-free option available! If you love vegan cheese, we have some delicious recipes on this website including the best vegan cheese sauce ever and even sweet potato cheese sauce.
Reasons you will love this vegan cheese
- Creamy and Stretchy Texture – This cashew mozzarella vegan cheese boasts a creamy, stretchy consistency that mimics traditional mozzarella, making it perfect for topping pizzas, pasta dishes, or using in casseroles.
- Nutritious and Wholesome – Made from raw cashews, this vegan cheese is packed with healthy fats, protein, and essential nutrients, providing a delicious and nutritious alternative to dairy cheese without compromising flavor.
- Easy to Make – Whipping up cashew mozzarella is a breeze, requiring just a few simple ingredients and minimal prep time, allowing you to enjoy homemade vegan cheese in no time!
- Versatile for Various Dishes – This cashew mozzarella can be used in a variety of recipes, from lasagna and stuffed shells to salads and sandwiches, making it a versatile ingredient that elevates your plant-based meals.
Ingredients you will need

Regular mozzarella cheese is not dairy-free, because it’s made with milk. However, this cashew mozzarella is! It is made with only five ingredients and it’s completely vegan, dairy-free, oil-free, and gluten-free.
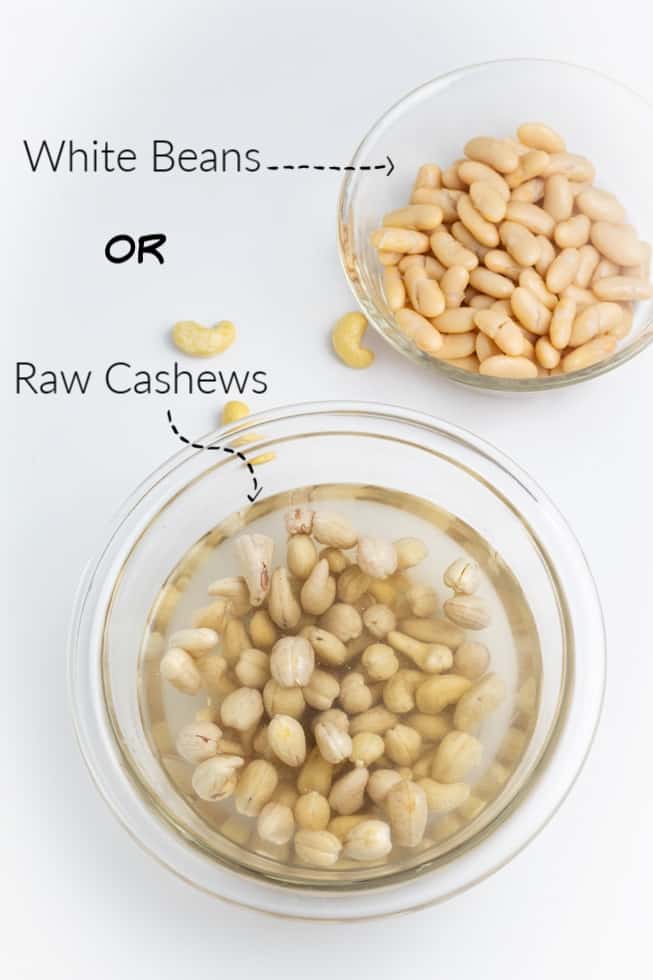
- Raw cashews- Using raw cashews to make cashew mozzarella cheese is essential because they have a mild flavor and creamy texture that blend smoothly into a rich, velvety cheese alternative. For those avoiding nuts, white beans can be used, but it changes the taste and texture.
- Nutritional yeast– Adds a distinctive cheesy flavor and umami richness, which enhance the overall taste of the cheese alternative.
- Thickener- Cornstarch or arrowroot powder helps achieve the desired stretchy and gooey texture that is characteristic of traditional mozzarella. These starches act as thickening agents, allowing the cheese to melt smoothly and hold together when heated.
- White wine vinegar– This acidity helps mimic the taste of traditional mozzarella, providing a well-rounded flavor that balances the creaminess of the cashews.
- Salt- Enhances the overall flavor, making it taste more like traditional cheese. It helps to bring out the natural flavors of the cashews and other ingredients, creating a well-balanced and savory profile.
Cashews or white beans for the base
The base of this cheese recipe is soaked cashews, however, there are many folks that need to avoid nuts due to allergies or calories. That’s why I came up with a white bean option as well.
Personally, I love the cashew version because the flavor is out of this world. However, I understand completely that some folks have nut allergies or heart disease and are staying away from nuts.
When soaked, the raw cashews create a creamy texture and neutral flavor that pairs well with tangy white wine vinegar and nutty nutritional yeast. When blended together with the other ingredients, it creates a powerful warm, creamy, nutty flavor that is perfect for mozzarella.
Thankfully, white beans do a good job of substituting in this cashew cheese recipe. Just keep in mind that the outcome will taste a bit different.
Tips & Suggestions
- Soaking cashews- The fast method for soaking cashews is in very hot water for at least an hour. The slower method can be done in cooler water for 6+ hours.
- Beans- The white beans I prefer in this recipe are white cannellini beans.
- Freezing- The bean version does freeze and grate as well. It’s a little darker in color and the taste, as well as texture, is different from the cashew version of course. I much prefer the cashew cheese, but white beans will work as a substitute. Once it’s frozen and shredded, it has to stay frozen and can’t be refrigerated.
How to make cashew mozzarella cheese
The recipe card at the bottom of the page has the full list of ingredients with measurements and instructions.
STEP #1: Begin by deciding whether you would like to use raw cashews or white beans for the base.
If you are using cashews, you’ll need to soak them in enough hot water to cover them for at least 1 hour or overnight. Drain the water once they’re ready.
I have also made this without soaking the cashews, but the texture and flavor are better if they are soaked even when using my Vitamix blender. I do highly recommend soaking.
And, I hope it goes without saying that if you’re using white beans, they will need to be cooked first unless they are from a can. If they are from a can, remember to drain the liquid and rinse them well.
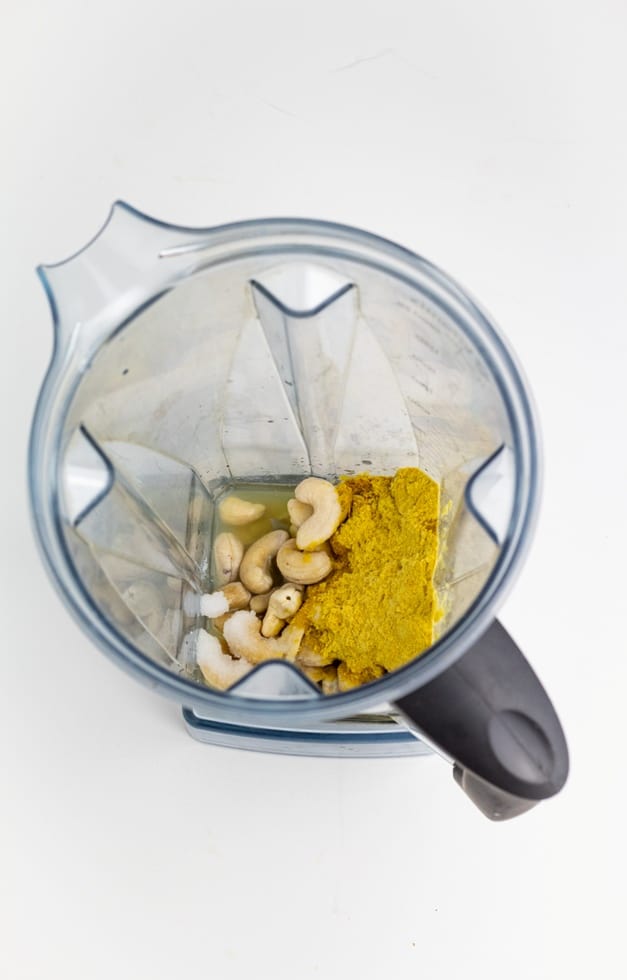
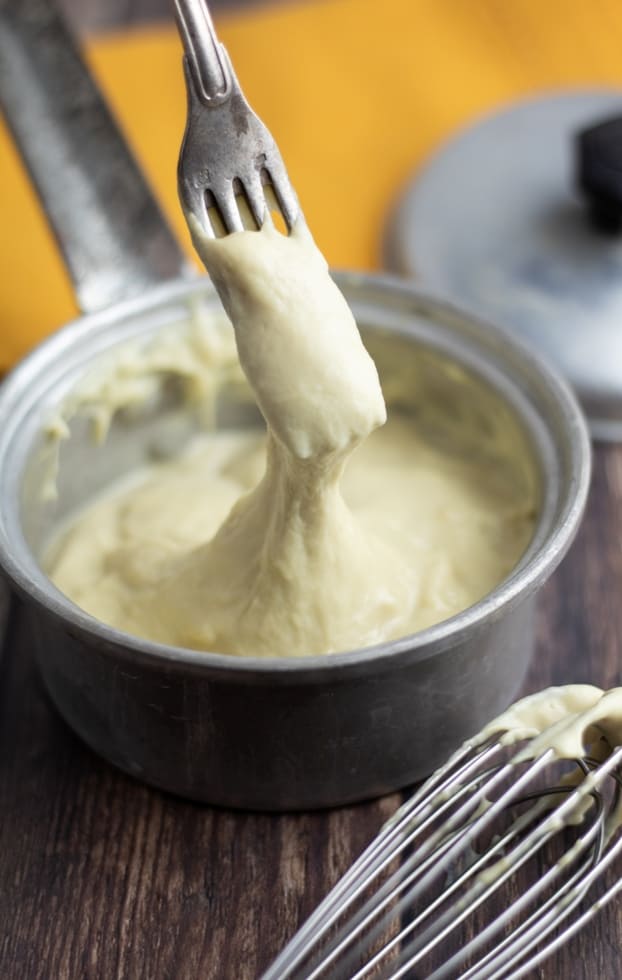
STEP #2: Once the cashews have soaked and become softened, drain them, and add all of the ingredients to a blender and process on high until smooth.
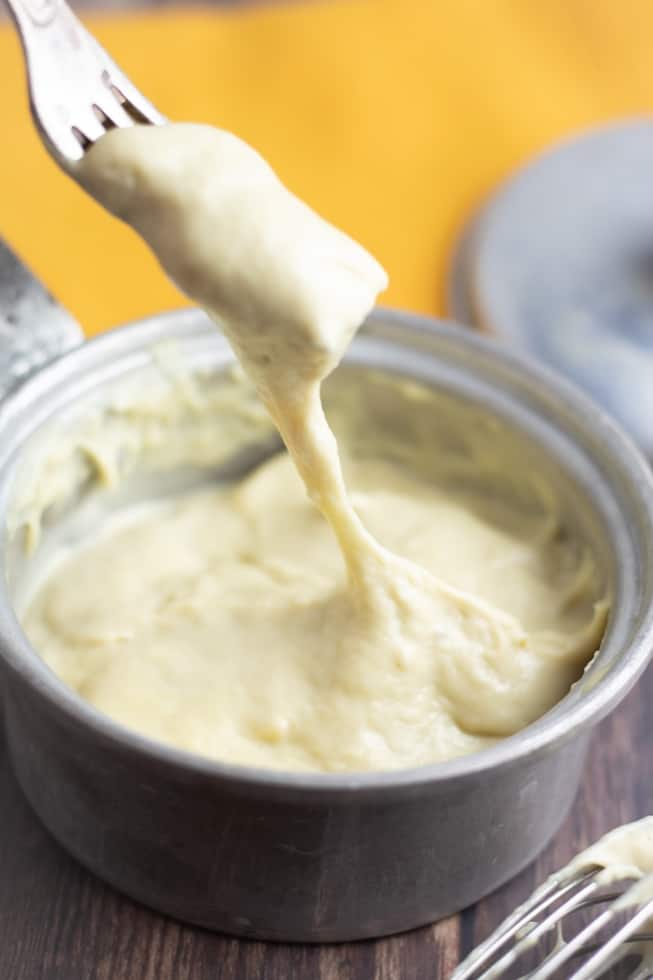
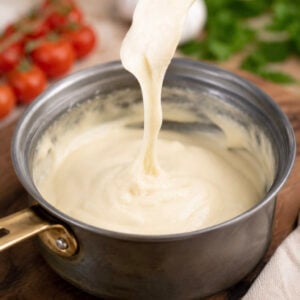
STEP #3: Next, pour the blended cheese ingredients from the blender or food processor into a saucepan. Begin by slowly heating and whisking together as it warms. This will happen quite quickly.
Do not leave it unattended because it needs to be stirred nearly constantly until it reaches the desired thickness and stretchiness.
The demo video below shows how creamy and stretchy the texture of this cashew cheese becomes while it’s heating up. Be sure to check it out!
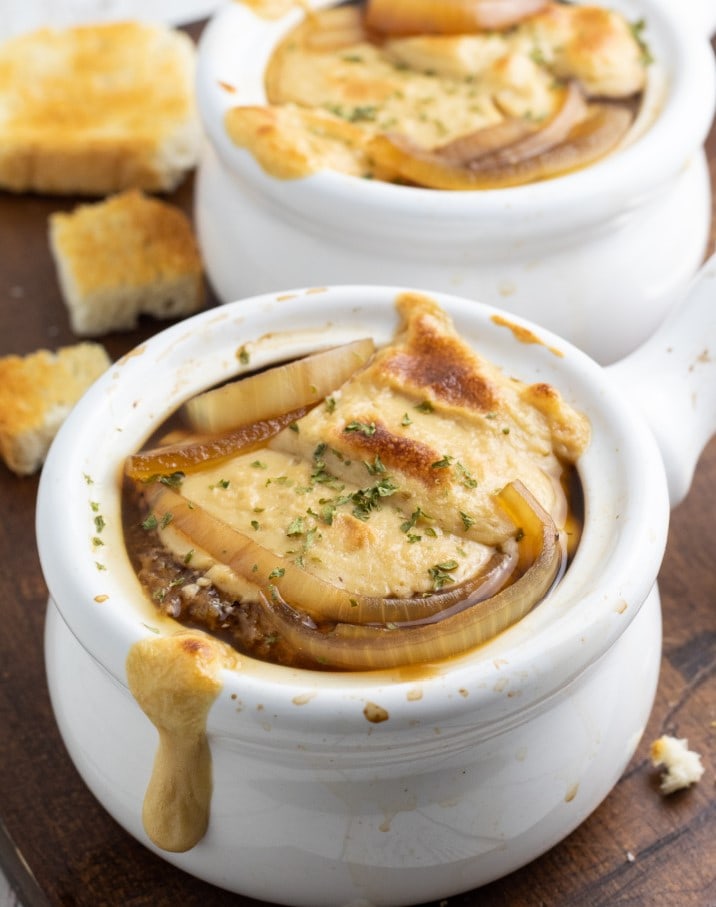
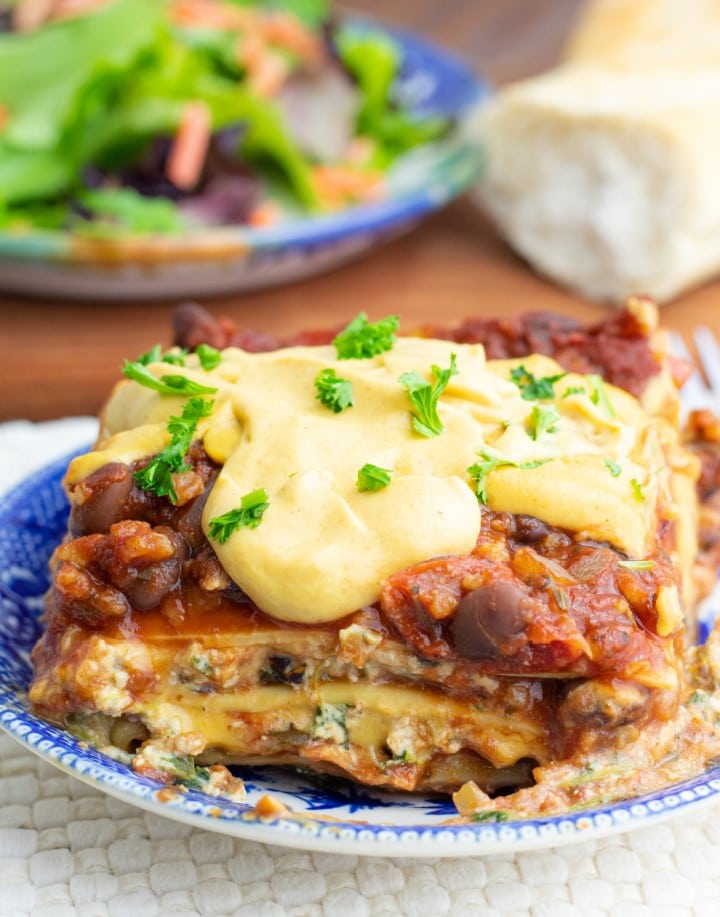
STEP #4: At this point, the cheese is ready to be used in other recipes like grilled cheese sandwiches, spinach lasagna, quesadillas, veggie pizza, vegan meatballs, French onion soup, or anything else that comes to mind.
Making your own vegan mozzarella cheese is very simple and SO much better for your health than the processed store-bought varieties. If you’re looking for a super quick recipe, try this 5-Minute Vegan Cashew Queso.
Can you freeze cashew cheese?
Absolutely, and I actually highly recommend freezing this cashew cheese. Once it’s frozen, it can be grated to use as shreds which are terrific on pizza and salads.
I simply pour it into a glass dish and cover it well then place it in a freezer bag. When it’s frozen solid, remove it from the freezer and grate it into shreds.
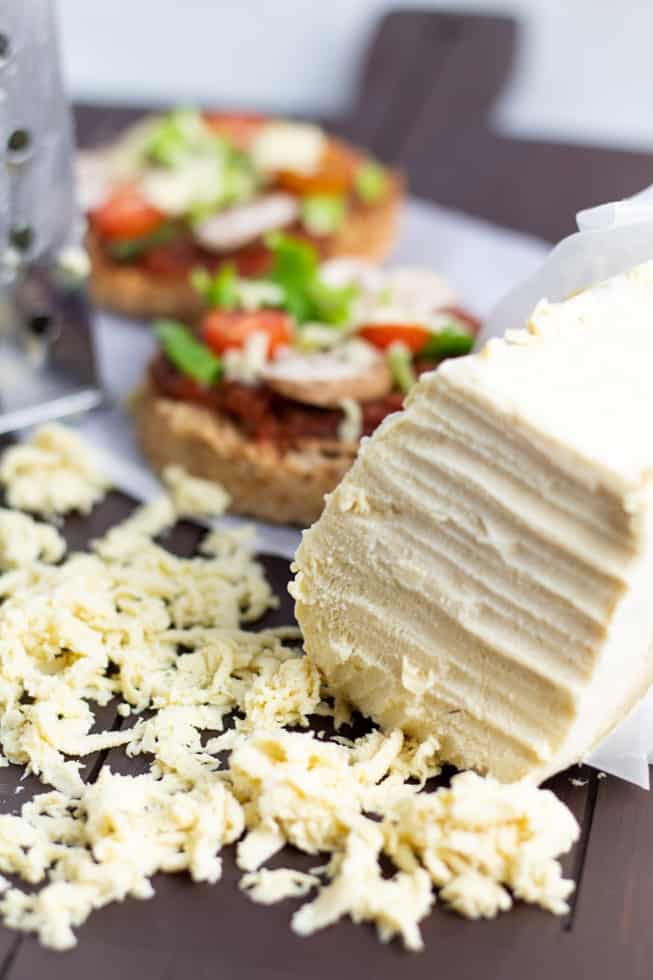
Use the shreds as a topping for pizza, soups, and salads. You can even slice it and make grilled cheese sandwiches. Refreeze immediately or it will become soft.
Once it’s frozen and shredded, it has to stay frozen and can’t be refrigerated.
Make it sliceable
*Update- I was recently messing around with trying to find a way to make my Vegan Cheese Sauce Recipe sliceable, and it was a success. Now that same concept can be used with this mozzarella cheese as well.
- Beginning at step #5 in the original instructions, simply leave the mozzarella in the blender while you prepare the thickener that will make it sliceable.
- In a small or medium saucepan, add 3/4 cup water plus a little over 1 tablespoon agar powder and bring it to a boil. It is important not to leave it at this point because it will thicken pretty quickly.
- Turn down the heat to low and whisk continually until the mixture thickens to a molasses-like consistency.
- Next, quickly pour it into the blender with the prepared mozzarella and blend for approximately 30 seconds to mix it well.
- Now, it’s time to pour the cheese into containers that are the shape that you would like your hard cheese in. Personally, I use mini loaf pans and round souffle dishes. Another good option would be mini loaf nonstick silicone molds.
- Smooth out the top of each one with a spoon or spatula so that when they are flipped out onto a plate, the bottom will be flat.
- Place the molds into the refrigerator for a at least couple of hours or longer. As it chills, the harder the cheese becomes, so the longer the better. Carefully turn out the cheese blocks onto a plate or serving platter with crackers.
Other amazing vegan cheese recipes
- Best Vegan Cheese Sauce
- Cashew Vegan Mozzarella
- Nacho Cheese
- Vegan Ricotta
- Vegan Parmesan Cheese
- Easy Vegan Cream Cheese
Frequently Asked Questions
Somewhat, when made with starches like cornstarch or arrowroot, it can become stretchy, making it ideal for pizzas, casseroles, or any dish where you want that gooey cheese effect. It doesn’t melt just like regular mozzarella though.
Yes, vegan cashew mozzarella cheese is naturally gluten-free as it doesn’t contain wheat or gluten-based ingredients, especially if you use gluten-free starches like cornstarch or arrowroot.
Homemade cashew mozzarella cheese can last up to 5-7 days when stored in an airtight container in the refrigerator. Be sure to refrigerate it promptly to maintain its freshness.
Recipes That Use Vegan Mozzarella


If you try this recipe, please let us know how you like it by rating it and leaving a comment. We love to hear from you!
Want to Save This Recipe?
Enter your email & I’ll send it to your inbox. Plus, get great new recipes from me every week!
By submitting this form, you consent to receive emails from EatPlant-Based
Cashew Cheese Mozzarella
Ingredients
- 3/4 cup water
- 1/4 cup raw cashews or white beans
- 1 tablespoon white wine vinegar
- 1 tablespoon nutritional yeast flakes
- 1 tablespoon cornstarch arrowroot powder, , or other thickener
- 1/2 teaspoon salt
Instructions
- Begin by deciding whether you would like to use raw cashews or white beans for the base. Personally, I love the cashew version because the flavor is out of this world. However, I understand completely that some folks have nut allergies or heart disease and are staying away from nuts.
- If you are using cashews, you'll need to soak them in very hot water for 1 hour or overnight or at least 6 hours in cool water.
- If you're using white beans, they will need to be cooked first unless they are from a can. If they are from a can, remember to drain the liquid and rinse them well.
- Once the cashews have soaked and become softened, add all of the ingredients to a blender and process on high until smooth.
- Next, simply pour the blended cheese ingredients from the blender or food processor into a saucepan. Begin slowly heating and whisking together as it warms. This will happen quite quickly. Do not leave it unattended because it needs to be stirred nearly constantly until it reaches the desired thickness and stretchiness.
- At this point, the cheese is ready to be used in other recipes like grilled cheese sandwiches, lasagna, quesadillas, veggie pizza, no-meat balls, French onion soup, or anything else that comes to mind.
Video
Notes
Nutrition
Disclaimer
To obtain the most accurate representation of the nutritional information in a given recipe, you should calculate the nutritional information with the actual ingredients used in your recipe, using your preferred nutrition calculator. You are solely responsible for ensuring that any nutritional information provided is accurate, complete, and useful.

About Terri Edwards
Hi guys! I’m the content creator behind EatPlant-Based and a licensed Food for Life instructor with the Physicians Committee for Responsible Medicine. I’m passionate about sharing healthy recipes and tips to help others care well for their health and the bodies God has given us. I’m so glad you’re here! Read More…
So I tried to make a larger batch (4x) and it never thickened. I used arrowroot as the thickening agent.
-Can this recipe be made in larger batches?
-Curious if there is a thickening agent that works better than another?
Hi Amy- There shouldn’t be any problems with making larger batches. As long as you increase the amount of arrowroot (or cornstarch) accordingly, it should thicken up just as well as it does with smaller batches.
Alright I will give a try again. I followed the recipe and something didn’t work for me 🙂 I use an induction stovetop so maybe I needed to turn the heat up higher as I read another comment where someone put the heating setting to 5 with an induction stovetop.
Thank you for getting back so quickly!
I am having this same issue with making a larger batch (8x)
I’ve been stirring on my gas stove top for 20 minutes and no thickening. Any guesses about what’s happening? I even added an additional 4 tablespoons of cornstarch (besides the 8 I put into the food processor.)
Carolyn- This is such an interesting issue. I can’t figure out why making larger batches would make a difference with how this recipe thickens. All that I can suggest is to keep adding thickener until it begins to thicken up. I’ve never made more than a double-batch, so I haven’t experienced this myself.
I just made this and have it in the freezer. I tasted it when I transferred it to the container and must say that it has a really good flavor. At first I thought it might be a little on the salty side but the second taste was okay. I used white vinegar in place of the white wine vinegar. 3/4 tbl. vinegar, 1/4 tbl. water, dash of sugar. Seemed to work out from the taste of it. Can’t wait to grate it and put it on something! Thanks for the recipe.
Hi Terri, I tried this cheese with home cooked garbanzo beans because I thought it would be a richer flavor than white beans. I have heart disease so I don’t eat nuts now. I wanted you to know that I think the garbanzos are better than white beans in flavor. It was delicious. You might want to try it. I would like to get your opinion.
Hi Gayla- I’m so glad that garbanzo beans worked for you. It surprises me a bit because garbanzo beans are not soft and smooth like navy, great northern, or cannellini beans. Great to know the chickpeas work, and thanks for letting me know!
Thank you for this recipe. I used it on your easy veggie pizza recipe (using Sami’s Bakery Millet crust) last night & it was delicious!!
Hi Tracey- You are welcome, and I’m so glad you enjoyed it. Sami’s pizza crusts are simply amazing in my opinion, and when you top them with yummy veggies and this cheese. OMGosh! 😀
Today (3.14.20) I tried this recipe I cooked it in a small saucepan on medium heat on my induction stovetop my dial was set to 5.5 I stirred it with a wire wisk until it came together and pulled away from the sides of the pot it was just beginning to stick to the bottom of the pan and I removed it from the heat at this point it was about 10 minutes to get to this point. I removed it from the pan to a small square lock and lock container to let it cool down. Once cooled the mixture was easily removed from the container with a knife around the edge and a few taps on the bottom. I took some to use on my burger patty for lunch and wrapped the rest in waxed paper to chill in the fridge. Taste wise it is a good flavour and worked very nicely on my burger I am looking forward to trying it on a pizza soon. Thank you for an quick and easy recipe that turns out great.
Hi Sheri- I’m so glad that the cashew cheese turned out so well for you. Having it on your veggie burger sounds like a terrific idea!
Are you using the cashew nut soaking water?? I always rinse the nuts after soaking. If I rinsed them would I use the same amount of water? Thank you. Elizabeth Shipley
No, you don’t want to use the cashew soaking water as an ingredient. Once the cashews have soaked and become softened, drain them, and add all of the ingredients to a blender and process on high until smooth. I hope you enjoy it!
I have some fresh rejuvelac that I made for another recipe and wonder if that could be a sub for the liquid?
I have not tried rejuvelac before but am interested how it turns out, if you use it in this recipe.
So the 3/4 c. water is that what you use to soak the cashews or does that water get added to the blender
The 3/4 c. water is added to the blender. To be honest, I often don’t even soak the cashews, because my Vitamix blends them into a creamy smooth texture. However, soaking does add even more texture (especially for those with lower powered blenders) and flavor. Hope you enjoy the recipe!
Does it have to be white wine vinegar? I dont think it is available where I live….
Joanna, I think it would be just fine in another type of vinegar. I say give it try!
You have really outdone yourself with this one! I have made some other cheesy recipes which were pretty good, but I love the creamy stretchy mouth feel to this one. Great on whole grain pizza with lots of veggies added, of course. Thanks for your very creative work!
I love this cheese it’s perfect!
I usually make my cheese sauce (we call fa-cheesy, say it in an Italian way!) with cannellini beans. I have heart disease so I stay away from nuts. Would that work as a replacement for the cashews?
I have substituted white beans for cashews in a number of other recipes, including my regular cheddar ‘cheese’ sauce. I think it would certainly be worth giving a try with this one. I would love to hear how it turns out for you. Thank!
okeedoke! when I get a chance, I will try this and let you know what happens….thanks for the input!
I’m wondering if you have tried freezing this and then grading it, which would make it easier to sprinkle on pizza?
It’s a brand new recipe, so I haven’t tried that yet. Sounds like a great idea, and I would love to hear how it does if you give it a try.
Yes I did this and it works fabulously!!! After freezing and grating I put in the refrigerator and it stays in shredded form…so wonderful.